In our previous post, we covered the fundamental aspects of Oracle Database Service for Azure (ODSA). In this post, we will delve into the process of connecting OCI with Azure specifically for Oracle Database Service for Azure (ODSA).
Requirement on the Azure Side:
- An existing Azure account.
- Necessary Azure roles.
Requirement for the Azure Roles:
- Admin Roles: Needed for initial OracleDB for Azure setup (for one-time setup)
- User Roles: Needed by application and database developers.
So, for OracleDB for Azure Onboarding, you have two options:
1) Give your Azure user any of the below 4 roles. Your user will then work as an “Onboarding User”
- Application Administrator
- Cloud Application Administrator
- Privileged Role Administrator
- Global Administrator
2) Create a brand new Azure admin user and give any of the above 4 roles. This new user will then act as an “Onboarding User”
Note: You can remove the role assignment for security purposes after the sign-up is complete.
Region Selection:
OracleDB for Azure is available in all key regions but not available in all regions. Identify the primary OCI region you want to use as your default region for OracleDB for Azure resource provisioning. See Regional Availability for a list of locations offering OracleDB for Azure.
OracleDB for Azure Onboarding Steps
An Azure administrator must first onboard an Azure environment with OracleDB for Azure.
To start OracleDB for Azure onboarding, go to https://signup.multicloud.oracle.com/azure.
Types of Onboarding Processes:
There are two types of onboarding processes:
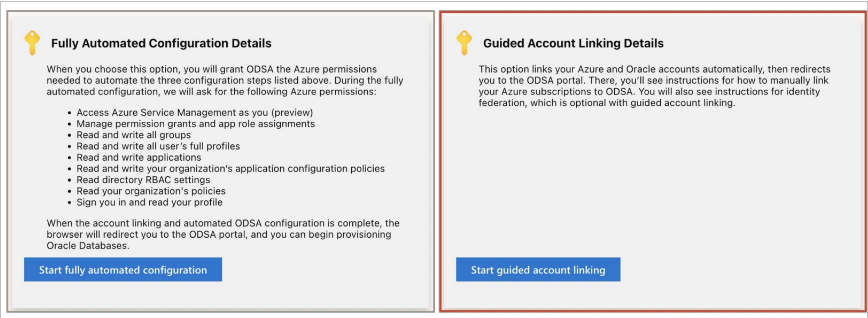
1. Fully-Automated Onboarding Process
This is faster and more convenient than guided account linking,
This automated process requires that the onboarding user has one of the four admin Azure Roles that we discussed earlier.
High-Level Steps:
1. Logs into the OracleDB for Azure sign-up page using their Azure credentials.
https://signup.multicloud.oracle.com/azure
2. Grant OracleDB for Azure the permissions it needs to complete the automated onboarding process.
3. Select one or more Azure subscriptions to link to OracleDB for Azure.
4. Log into an existing OCI account or creates a new OCI account.
The automation process will do below steps:
- Create an Oracle Database Service (ODS) enterprise application
- Create custom roles in the Azure tenant’s Azure Active Directory.
- Grants the ODS application the permissions it needs in each of the selected subscriptions.
- Creates the OracleDB for Azure groups in the Azure tenant’s Azure Active Directory (AAD).
- Creates a Multicloud Link (MCL) configuration in the user’s OCI tenancy.
- Updates the MCL with configuration settings for each of the linked subscriptions.
- Creates and configures the private link between Azure and OCI using Oracle Interconnect for Azure.
- Federates the Azure tenant’s Azure Active Directory (AAD) to OCI IAM and configures it to only synchronize user accounts that are members of the OracleDB for Azure custom groups that OracleDB for Azure created in AAD.
Before other Azure users can log into OracleDB for Azure, an Azure administrator must either add Azure users or groups to the custom Azure Active Directory groups ODSA created above during onboarding or assign the OracleDB for Azure custom roles to Azure users or groups.
2. Guided Onboarding Process
Some organizations may have security policies that do not allow them to grant the required permissions to the Oracle Database Service enterprise application that runs in their Azure account. Guided onboarding is provided for customers who do not want to grant OracleDB for Azure all the Azure permissions required for fully automated onboarding.
Guided Onboarding will follow the three onboarding steps
1. Account Linking Step:
An Azure user will do below:
- Logs into the OracleDB for Azure sign-up page using their Azure credentials.
- Grant OracleDB for Azure a minimal permission set needed to complete the automated account linking process.
- Sign in to your Oracle Cloud Account next
After the linking of your OCI account to your Azure account is complete, you will be taken to the OracleDB for Azure portal.
This step will accomplish below:
- Creates an Oracle Database Service (ODS) enterprise application and custom roles in the Azure tenant’s Azure Active Directory.
- Creates OracleDB for Azure groups in the Azure tenant’s Azure Active Directory.
- Creates a Multicloud Link (MCL) configuration in the user’s OCI tenancy.
- Creates and configures the private link between Azure and OCI using OCI Interconnect for Azure.
OracleDB for Azure is not operational in this step. At least one Azure subscription to OracleDB Azure is needed which will be done in the next step
2. Subscription Linking Step:
One of the ways Azure allows users to group resources together is by subscriptions. When Azure administrators provision resources in Azure, they must select a subscription to associate with. Many Azure accounts can have hundreds or thousands of subscriptions. You can use a subset of subscriptions with OracleDB for Azure.
Note that to view and link an Azure subscription in the OracleDB for Azure portal, you must have Owner privileges for the subscription.
Azure administrators must link at least one Azure subscription to OracleDB for Azure.
For guided onboarding, OracleDB for Azure offers a partially automated subscription linking process.
An Azure administrator must do below steps:
- Log into the Azure Portal and grant the currently logged-in user the OracleDB for Azure Multicloud Link Administrator role (odsa-multicloud-link-administrator). This is needed to update the multi-cloud link configuration with the linked Azure subscription configuration details.
- In the Azure portal, grant the Oracle Database Service (ODS) enterprise application four roles (Contributor, Network Contributor, Monitoring Metrics Publisher, EventGrid Data Sender) in each subscription being linked to ODSA
- In the OracleDB for Azure Portal, the user logs out of the portal and then log back in again, so that OracleDB for Azure recognizes the new role assignment.
- The user refreshes the list of available Azure subscriptions (the ones OracleDB for Azure can now access because of the recent role assignments).
- For each listed subscription being linked, select the subscription from the list, then click the Link Subscription button to link the selected subscription to OracleDB for Azure.
After you complete the steps above, OracleDB for Azure is fully operational. Authorized users can use the OracleDB for Azure portal to deploy and provision OracleDB for Azure databases and infrastructure for use in their Azure environment.
3. Identity Federation (optional when using guided onboarding):
In some instances, an OracleDB for Azure user may need to log into the OCI Console to perform specific tasks that aren’t enabled or available in OracleDB for Azure today. To make this process easier, Azure customers can set up an identity federation between the Azure and OCI tenancies to use a single set of Azure credentials, to log into Azure and OCI.
There is no automated process for configuring identity federation and you need to follow the manual process.

- Oracle Database Service for Azure (ODSA) 3 – Database Services - May 1, 2023
- Oracle Database Service for Azure (ODSA) 2 – Interconnect Details - April 30, 2023
- Oracle Database Service for Azure (ODSA) 1 – Fundamentals - April 29, 2023