
In this post we will be cloning an Oracle Database 12c Pluggable Database from one Database Cloud Service to another.
We can have multiple options for doing this data migration. For our example we will use remote cloning of a PDB using Database Links. Note that this post will use the unique features of Oracle Database 12c Multitenant and Pluggable Databases (PDB). This was a new and the key feature of Oracle 12c which is not present in Oracle database version 11g.
With PDBs in 12c you have got ease of data migration. You may have to move PDBs between test and production environments in your live environemntes and this process makes data migration a simple process. In this post we will be cloning a PDB from one Oracle Database Cloud Service to another Oracle Database Cloud Service using database links.

Source Database:
Database Cloud Service: Production
PDB Name to be cloned: PRODPDB1
Target Database:
Database Cloud Service: Brijesh
Goal:
To clone PRODPDB1 pluggable database from ‘Production’ database service to ‘Brijesh’ database service.
Below is the series of steps that will be followed to accomplish this goal.
STEP 1 : Enable communication between Source and Target by Security Rules
STEP 2 : Add Source PDB TNS Entry in Target tnsnames.ora
STEP 3 : Create DBLINK in Target to connect to Source PDB
STEP 4 : Change the Source wallet from 'Autologin' to 'Password'
STEP 5 : Export the keys for Source PDB from Source Wallet
STEP 6 : Transfer the exported keys from Source to Target server
STEP 7 : Change the Target wallet from 'Autologin' to 'Password'
STEP 8 : Import the copied keys into Target Database Wallet
STEP 9 : Set the source PDB to read only mode
STEP 10 : Clone the Source PDB into Target database
STEP 11 : Revert back the source PDB to READ WRITE Mode
STEP 12 : Revert back the Source wallet from 'Password' to 'Autologin'
STEP 13 : Revert back the Target wallet from 'Password' to 'Autologin'
STEP 14 : Verify the newly cloned Target PDB
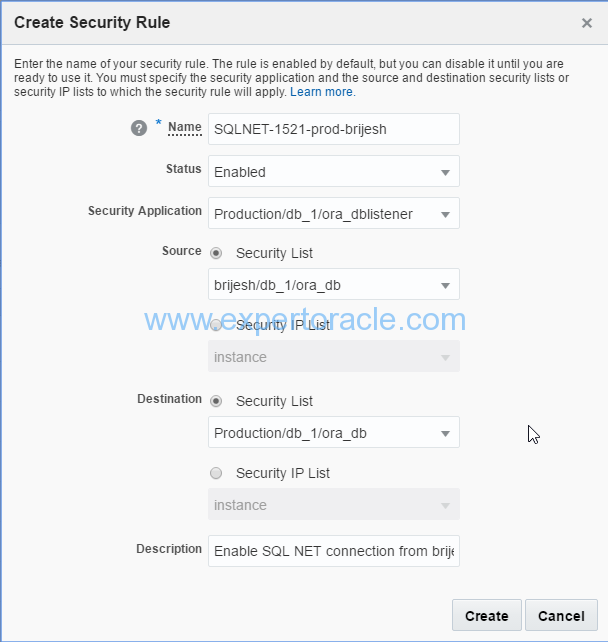
STEP 1 : Enable communication between Source and Target by Security Rules
From the Oracle Compute Cloud Service Dashboard navigate to the Network > Security Rules, and create a new rule.
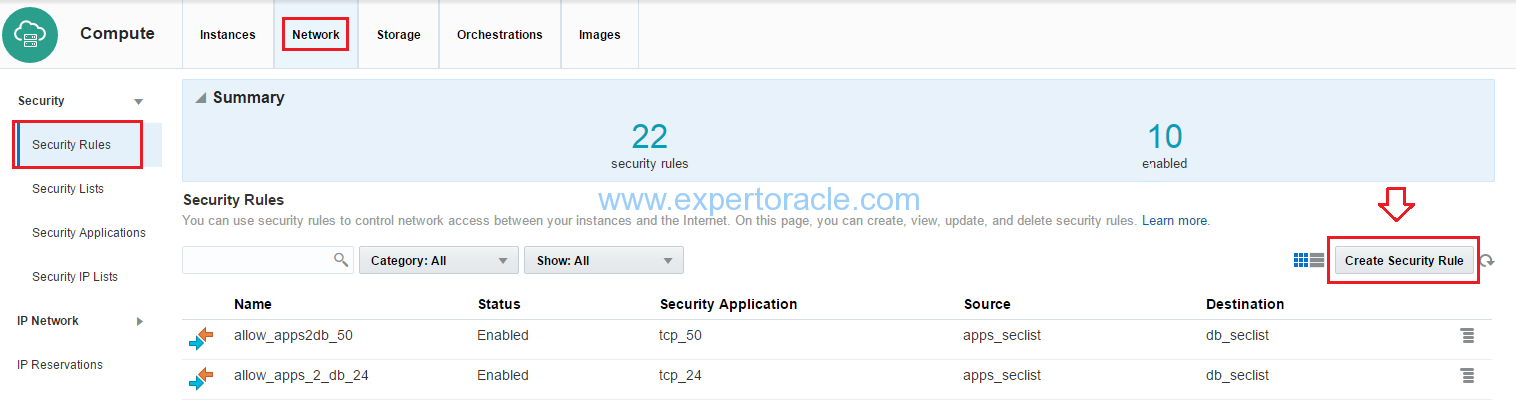
Input the below parameters as shown:
Give your security rule a name, and make sure it is enabled. This Security Rule is based on the Security Application Production/db_1/ora_listener, which opens the port 1521. The Source is brijesh/db_1/ora_db, and the Destination is Production/db_1/ora_db.
You will be able to see the new security rule in the list.

STEP 2 : Add Source PDB TNS Entry in Target tnsnames.ora
Open Putty connections to both ‘Production’ and ‘Brijesh’ compute instances
We will add source PDB tns entry, which is PRODPDB1 in our case. In the tns entry we will put private IP of the Production servers. Private IP can be easily located at the Compute Cloud Console in the instance information page or you can also run “ifconfig eth0” command from the unix command prompt to get it.
Go to $ORACLE_HOME/netowrk/admin and added below tns entry to the tnsnames.ora
PRODPDB1_CLONE =
 (DESCRIPTION =
 (ADDRESS = (PROTOCOL = TCP)(HOST = 10.196.139.62)(PORT = 1521))
 (CONNECT_DATA =
 (SERVER = DEDICATED)
 (SERVICE_NAME = prodpdb1.bgogia.oraclecloud.internal)
 )
 )
Verified if the connection is successful by tnsping command

STEP 3 : Create DBLINK in Target to connect to Source PDB
Now log into the database ‘Brijesh’ using SQL*Plus to create the Database Link that will be used to create a new PDB in this database.
$ sqlplus / as sysdba

SQL> set lines 132
col owner format a8
col DB_LINK format a40
col USERNAME format a10
col HOST format a25

select * from dba_db_links;

SQL> create database link db_link1 connect to system identified by <production_system_password> using 'PRODPDB1_CLONE';

SQL> select * from dba_db_links;
Verify if DB LINK is working OK
SQL> select name from v$database@DB_LINK1.BGOGIA.ORACLECLOUD.INTERNAL;

NAME
---------
PROD

SQL> exit
STEP 4 : Change the Source wallet from ‘Autologin’ to ‘Password’
The Oracle Public Cloud uses Transparent Data Encryption to secure the datafiles. When you move the pluggable databases you need to export/import the encryption keys. Before we can export the keys from the source PDB we need to first change the wallet type to ‘Password’ from ‘Autologin’
First keep the backup of /u01/app/oracle/admin/PROD/tde_wallet/cwallet.sso file
SQL> select WRL_TYPE, WRL_PARAMETER, STATUS, WALLET_TYPE from v$encryption_wallet;

WRL_TYPE     WRL_PARAMETER                          WALLET_TYPE
---------- ---------------------------------------- ----------
FILE        /u01/app/oracle/admin/PROD/tde_wallet/   AUTOLOGIN


SQL> administer key management set keystore close;
keystore altered.

SQL> administer key management set keystore open identified by "vana_05Nir" container=all;
keystore altered.

SQL> select wrl_type,wrl_parameter,wallet_type from v$encryption_wallet;

WRL_TYPE          WRL_PARAMETER                              WALLET_TYPE
-------------  -------------------------------------------  --------------------
FILE             /u01/app/oracle/admin/PROD/tde_wallet/       PASSWORD
STEP 5 : Export the keys for Source PDB from Source Wallet
In this step we will export the key from Source PDB in a temporary wallet file
Connect to Source PDB using SQLPLUS
SQL> administer key management export encryption keys with secret "<put_password>" to '/tmp/prodpdb1_2.p12'
     identified by "<put_password>" with identifier in
     (select key_id from v$encryption_keys where creator_pdbname='PRODPDB1');

keystore altered.
/tmp/prodpdb1_2.p12 will have the required key
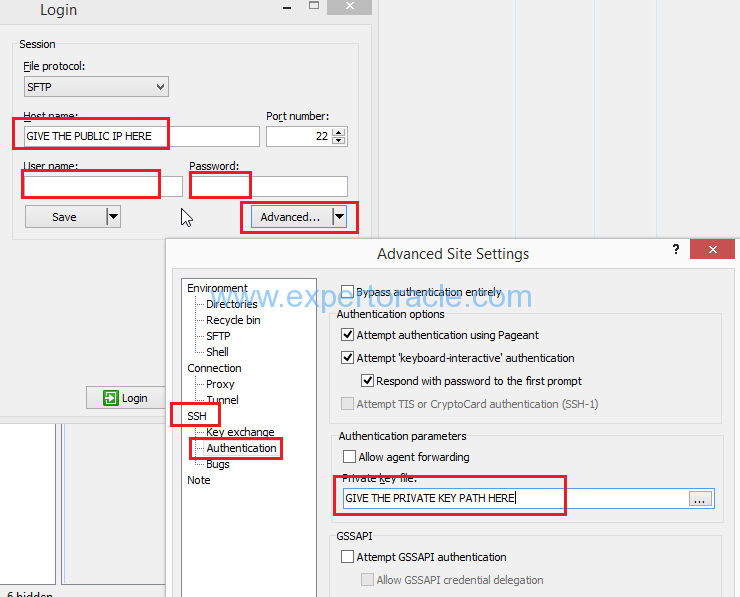
STEP 6 : Transfer the exported keys from Source to Target server
In this step we will copy the /tmp/prodpdb1_2.p12 from Source server to Target server using WINSCP software
Connect to WINSCP and provide all the below required details to connect to your Oracle Cloud Servers
STEP 7 : Change the Target wallet from ‘Autologin’ to ‘Password’
Now we have to open the wallet with password because the key that we brought in from Source server cannot be imported when wallet type is ‘autologin’
First keep the backup of /u01/app/oracle/admin/brijesh/tde_wallet/cwallet.sso file
Run below command by connecting to target PDB using SQLPLUS
SQL> administer key management set keystore close;
keystore altered.

SQL> administer key management set keystore open identified by "<put_password>";
keystore altered.

SQL> select wrl_type,wrl_parameter,wallet_type from v$encryption_wallet;

WRL_TYPE          WRL_PARAMETER                                     WALLET_TYPE
-------------  ---------------------------------------------------  ---------------------------------
FILE             /u01/app/oracle/admin/brijesh/tde_wallet/           PASSWORD
STEP 8 : Import the copied keys into Target Database Wallet
Run below command by connecting to target PDB using SQLPLUS
SQL> administer key management import encryption keys with secret "<put_password>" from
   '/tmp/prodpdb1_2.p12' identified by "<put_password>" WITH BACKUP USING '/tmp/tde_backup_001';
keystore altered.
STEP 9 : Set the source PDB to read only mode
Now from PuTTY we will connect to our ‘Production’ database service using SQL*Plus and set the source PRODPDB1 pluggable databsae to READ ONLY mode in the Oracle Database Cloud Service
$ sqlplus / as sysdba

SQL> show pdbs

CON_ID      CON_NAME                      OPEN MODE RESTRICTED
---------- ------------------------------ ---------- ----------
 2          PDB$SEED                      READ ONLY    NO
 3          PRODPDB1                      READ WRITE   NO

SQL> alter pluggable database PRODPDB1 close immediate;

Pluggable database altered.

SQL> show pdbs

CON_ID        CON_NAME                     OPEN MODE RESTRICTED
---------- ------------------------------ ---------- ----------
 2            PDB$SEED                    READ ONLY   NO
 3            PRODPDB1                    MOUNTED

SQL> alter pluggable database PRODPDB1 open read only;
Pluggable database altered.

SQL> show pdbs

CON_ID       CON_NAME                     OPEN MODE   RESTRICTED
---------- ------------------------------ ---------- ----------
 2          PDB$SEED                      READ ONLY    NO
 3          PRODPDB1                      READ ONLY    NO

SQL> EXIT;
STEP 10 : Clone the Source PDB into Target database
Now from PuTTY we will connect to our ‘brijesh’ database service using SQL*Plus and clone the PRODPDB1 to the ‘brijesh’ database service.
$ sqlplus / as sysdba

SQL> create pluggable database clone_pdb from PRODPDB1@DB_LINK1 keystore identified by "<put_password>";
Pluggable database created.

SQL> show pdbs
CON_ID      CON_NAME                      OPEN MODE RESTRICTED
---------- ------------------------------ ---------- ----------
 2         PDB$SEED                        READ ONLY   NO
 3         PDB1                            READ WRITE  NO
 4         CLONE_PDB                       MOUNTED

SQL> alter pluggable database CLONE_PDB open;
Pluggable database altered.

SQL> show pdbs
CON_ID      CON_NAME                      OPEN MODE RESTRICTED
---------- ------------------------------ ---------- ----------
 2         PDB$SEED                       READ ONLY    NO
 3         PDB1                           READ WRITE   NO
 4         CLONE_PDB                      READ WRITE   NO

SQL> select name, status, message, action from pdb_plug_in_violations where name='CLONE_PDB';
no rows selected
STEP 11 : Revert back the source PDB to READ WRITE Mode
Execute on the Source database from SQLPLUS
SQL> show pdbs

CON_ID CON_NAME OPEN MODE RESTRICTED
---------- ------------------------------ ---------- ----------
 2 PDB$SEED READ ONLY NO
 3 PRODPDB1 READ ONLY NO
SQL> alter pluggable database PRODPDB1 close immediate;
Pluggable database altered.

SQL> alter pluggable database PRODPDB1 open;

Pluggable database altered.

SQL> show pdbs

CON_ID CON_NAME OPEN MODE RESTRICTED
---------- ------------------------------ ---------- ----------
 2 PDB$SEED READ ONLY NO
 3 PRODPDB1 READ WRITE NO
STEP 12 : Revert back the Source wallet from ‘Password’ to ‘Autologin’
We will now revert the container wallet from Password to Autologin type. To accomplish this, we reintroduce the cwallet.sso file and then restart the Container Database.
$ mv /u01/app/oracle/admin/PROD/tde_wallet/cwallet.sso_bkp /u01/app/oracle/admin/PROD/tde_wallet/cwallet.sso

[oracle@Production admin]$ sqlplus / as sysdba
SQL*Plus: Release 12.2.0.1.0 Production on Thu Jan 5 04:47:49 2017
Copyright (c) 1982, 2016, Oracle. All rights reserved.
Connected to:
Oracle Database 12c Enterprise Edition Release 12.2.0.1.0 - 64bit Production

SQL> shutdown immediate
Database closed.
Database dismounted.
ORACLE instance shut down.
SQL> startup
ORACLE instance started.

Total System Global Area 2667577344 bytes
Fixed Size 8796336 bytes
Variable Size 687867728 bytes
Database Buffers 1962934272 bytes
Redo Buffers 7979008 bytes
Database mounted.
Database opened.

SQL> select wrl_type,wrl_parameter,wallet_type from v$encryption_wallet;

WRL_TYPE          WRL_PARAMETER                              WALLET_TYPE
-------------  -------------------------------------------  --------------------
FILE             /u01/app/oracle/admin/PROD/tde_wallet/       AUTLOGIN
STEP 13 : Revert back the Target wallet from ‘Password’ to ‘Autologin’
Similarly to the previous step we will revert back the Target wallet to ‘autologin’
SQL> select wrl_type,wrl_parameter,wallet_type from v$encryption_wallet;

WRL_TYPE          WRL_PARAMETER                              WALLET_TYPE
-------------  -------------------------------------------  --------------------
FILE             /u01/app/oracle/admin/brijesh/tde_wallet/       AUTLOGIN
STEP 14 : Verify the newly cloned Target PDB
Connect to newly cloned PDB in your target container database and verify
[oracle@brijesh ~]$ sqlplus / as sysdba
SQL*Plus: Release 12.2.0.1.0 Production on Thu Jan 5 04:58:46 2017
Copyright (c) 1982, 2016, Oracle. All rights reserved.
Connected to:
Oracle Database 12c Enterprise Edition Release 12.2.0.1.0 - 64bit Production

SQL> show pdbs

CON_ID      CON_NAME                      OPEN MODE RESTRICTED
---------- ------------------------------ ---------- ----------
 2         PDB$SEED                       READ ONLY    NO
 3         PDB1                           READ WRITE   YES
 4         CLONE_PDB                      READ WRITE   NO

SQL> sho con_name
CON_NAME
------------------------------
CDB$ROOT

SQL> alter session set container=CLONE_PDB;
Session altered.

SQL> sho con_name
CON_NAME
------------------------------
CLONE_PDB

SQL> create table dummy_CLONE_PDB(x number);
Table created.

SQL> insert into dummy_CLONE_PDB values(1);
1 row created.

SQL> commit;
Commit complete.
This completes the cloning of Oracle 12c Pluggable database from one Oracle Cloud Service to another


- Oracle Multitenant DB 4 : Parameters/SGA/PGA management in CDB-PDB - July 18, 2020
- Details of running concurrent requests in Oracle EBS - May 26, 2020
- Oracle Multitenant DB 3 : Data Dictionary Architecture in CDB-PDB - March 20, 2020
Because you cannot perform this operation in parallel with the production in the same database, you clone the PDB into another CDB.
Nice article Brijesh!