Orchestration is the automated management of your system components for high availability, monitoring, and persistence. It ties together the components you create into a single, manageable collection. For example, with orchestration you can associate networks, network security, and storage with the instantiation of a virtual machine. This instantiation can be restarted automatically if it terminates for some reason, or it can be monitored.
To read about basic concepts of Oracle Cloud ‘Orchestrations’ read this post first.
STEP 1: CREATE REQUIRED ORCHESTRATION JSON CODE FILES
In this post, we will be creating one master orchestration JSON file named master.txt and two nested orchestration JSON files named volume.txt and instance.txt.
volume.txt and instance.txt will be called from inside the master.txt orchestration JSON file.
Below are the JSON codes for the three orchestration that are used in our example:
volume.txt
volume orchestration is used to start and stop the storage volume
{
"description": "Simple orchestration plan with ssh keys and security list",
"name": "/Compute-bgogia/brijesh_gogia@infosys.com/volume",
"oplans": [
{
"label": "volume",
"obj_type": "storage/volume",
"ha_policy": "monitor",
"objects": [
{
"name": "/Compute-bgogia/brijesh_gogia@infosys.com/volume",
"size": "22G",
"index": 1,
"properties":["/oracle/public/storage/default"]
}
]
}
]
}
instance.txt
Instance orchestration is used to start and stop the instance,
{
"description": "Simple orchestration plan with ssh keys and security list",
"name": "/Compute-bgogia/brijesh_gogia@infosys.com/instance",
"oplans": [
{
"label": "instance",
"obj_type": "launchplan",
"ha_policy": "active",
"objects": [
{
"instances": [
{
"imagelist" : "/oracle/public/OL_6.4_20GB_x11",
"label": "instance",
"storage_attachments": [
{
"index": 1,
"volume": "/Compute-bgogia/brijesh_gogia@infosys.com/volume"
}
],
"networking": {
"eth0": {
"seclists": [
"/Compute-bgogia/default/default"
],
"nat": "ippool:/oracle/public/ippool"
}
},
"shape": "oc3",
"sshkeys": [
"/Compute-bgogia/brijesh_gogia@infosys.com/rsa-key-brijesh"
]
}
]
}
]
}
]
}
master.txt
Master orchestration is used to start and stop both the instance and storage volume, maintaining a relationship between the instance and volume,
{
"name": "/Compute-bgogia/brijesh_gogia@infosys.com/master",
"oplans": [
{
"label": "instance",
"obj_type": "orchestration",
"ha_policy": "monitor",
"objects": [
{
"name": "/Compute-bgogia/brijesh_gogia@infosys.com/instance"
}
]
},
{
"label": "volume",
"obj_type": "orchestration",
"ha_policy": "monitor",
"objects": [
{
"name": "/Compute-bgogia/brijesh_gogia@infosys.com/volume"
}
]
}
],
"relationships": [
{
"oplan": "instance",
"to_oplan": "volume",
"type": "depends"
}
]
}
STEP 2: UPLOAD THE JSON ORCHESTRATION FILES TO ORACLE CLOUD
After creating above JSON code files we saved all three of these in separate txt files and names them as volume.txt, instance.txt and master.txt
Now click on the orchestrations tab on the Overview page of Oracle Cloud Portal and then click on the Upload Orchestration button on the Orchestrations Overview
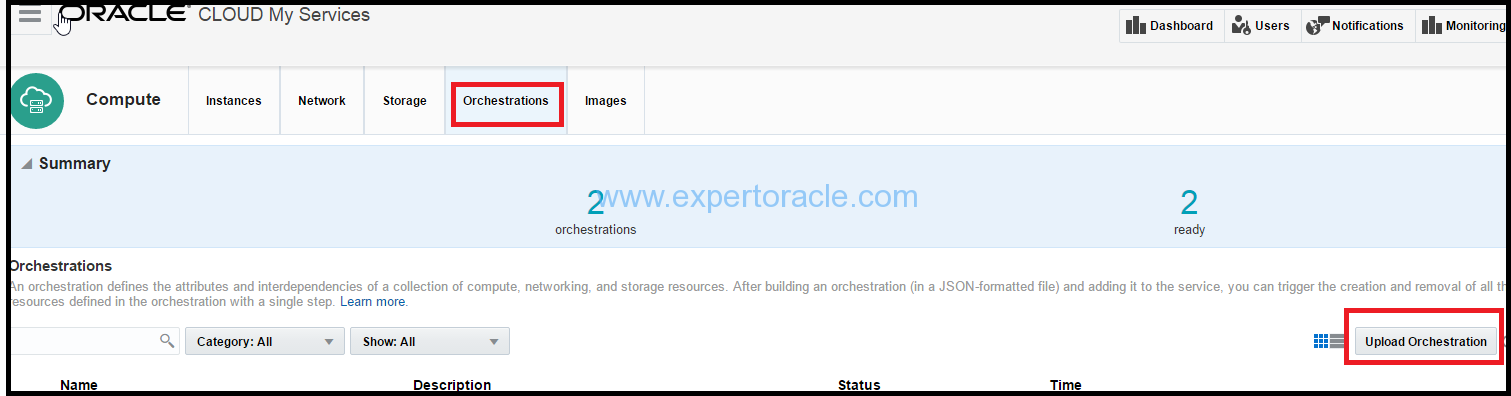
Choose the “volume.txt” created earlier and click upload
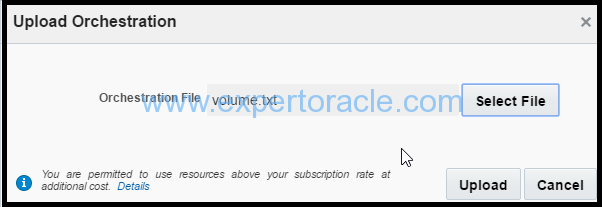
The volume orchestration should get uploaded and should be in “stopped” Status
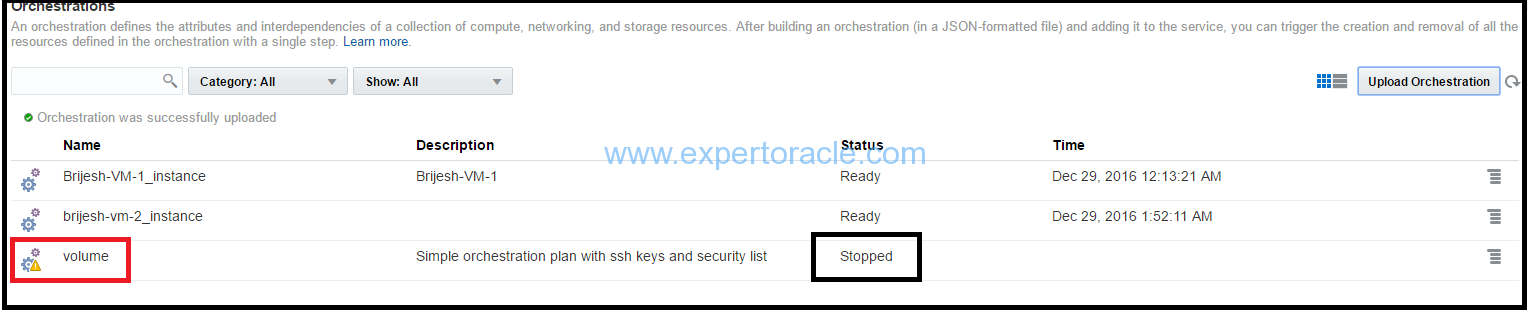
Similarly upload instance.txt JSON orchestration file
and finally in a similar way upload the master.txt JSON orchestration file.
The end result should be that all three orchestration should be visible and in “stopped” status.

STEP 3 : START THE MASTER ORCHESTRATION
From the Actions menu, select “Start” for the Master orchestration. This master orchestration should start the instance and the volume orchestrations as well automatically.
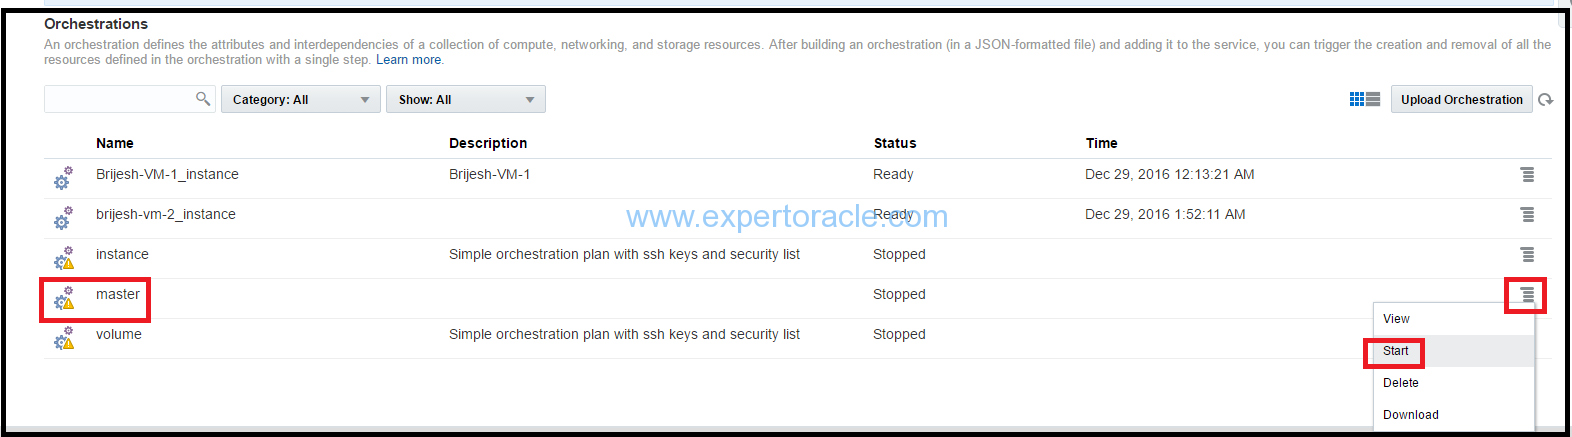
Click “Yes” in the “Start Orchestration” dialogue box
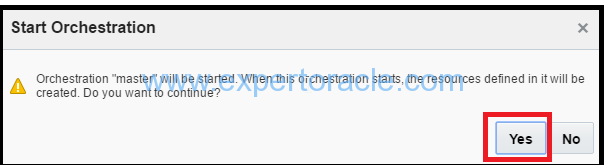
You should see the volume started first and then the instance when you refresh the page.

The master, instance and volume should be in ready state in some time

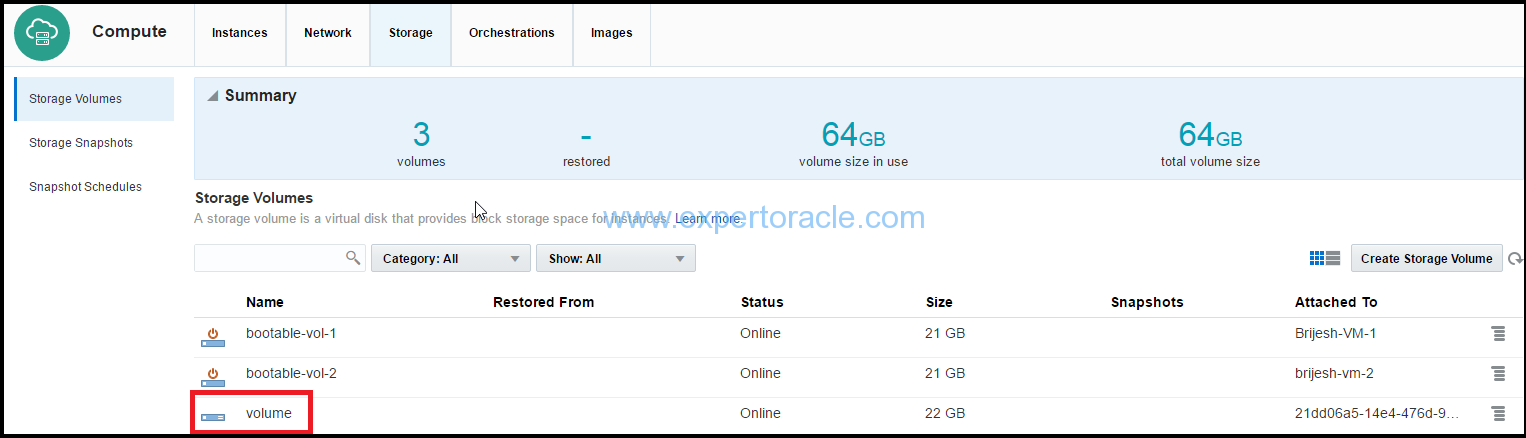
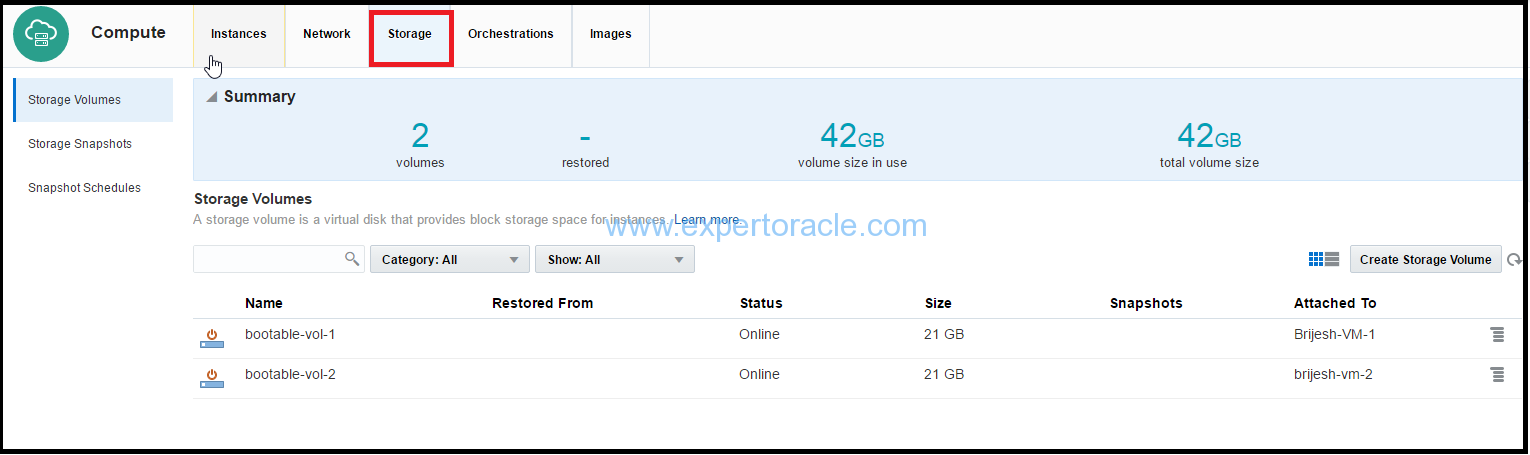
STEP 4 : VERIFY THE ORCHESTRATION RESULT
Click on the “Storage” tab on the Instances Overview page
The newly created volume should be displayed using the volume orchestration
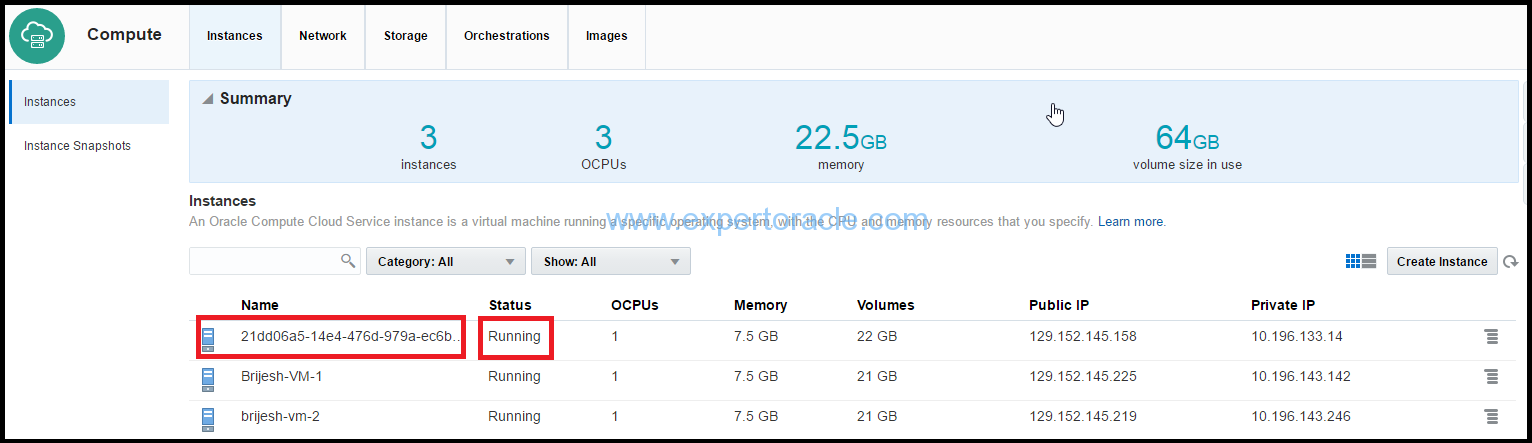
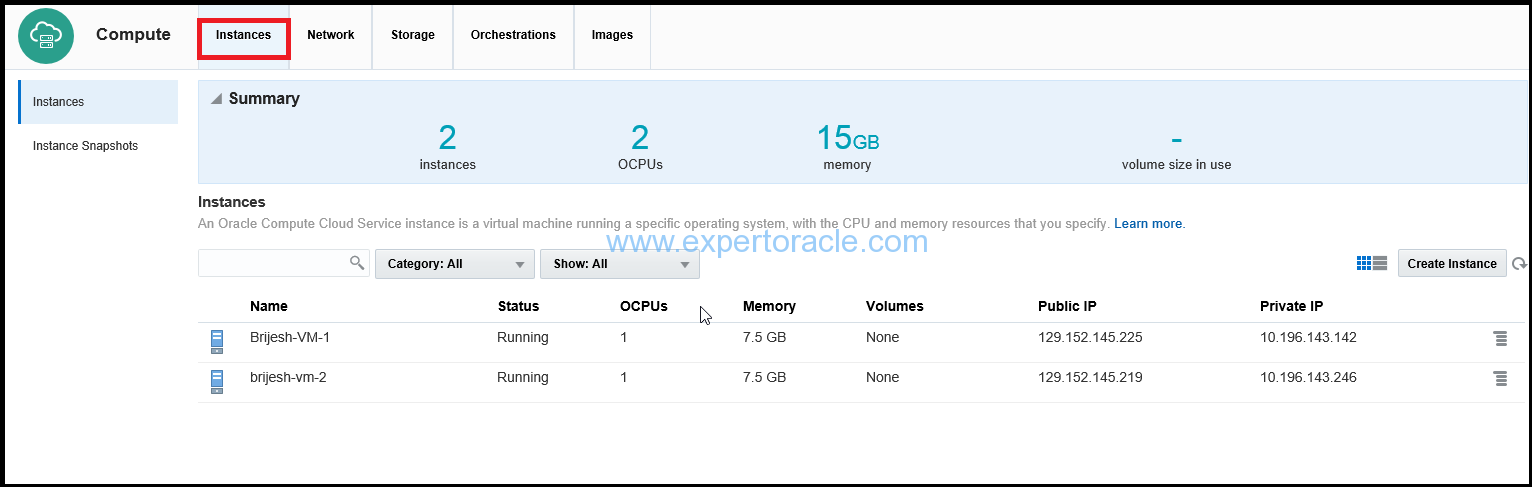
It may take 2 minutes for instance to show up. Click on the ‘Instances” tab on the Orchestration Overview page. The new instance created by above orchestration should show up in the list with status as “Running”.
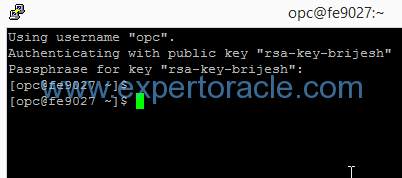
Also try to connect to the instance using public IP from putty software
STEP 5: DELETING THE ORCHESTRATION (IF REQUIRED)
After testing, if you want to delete this newly created orchestration then go to orchestrations tab on the Overview page of Oracle Cloud My Services application.
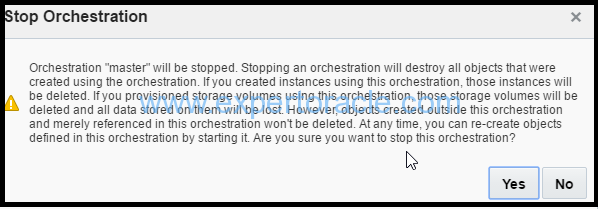
From the Actions menu, select “Stop” for the “master” orchestration
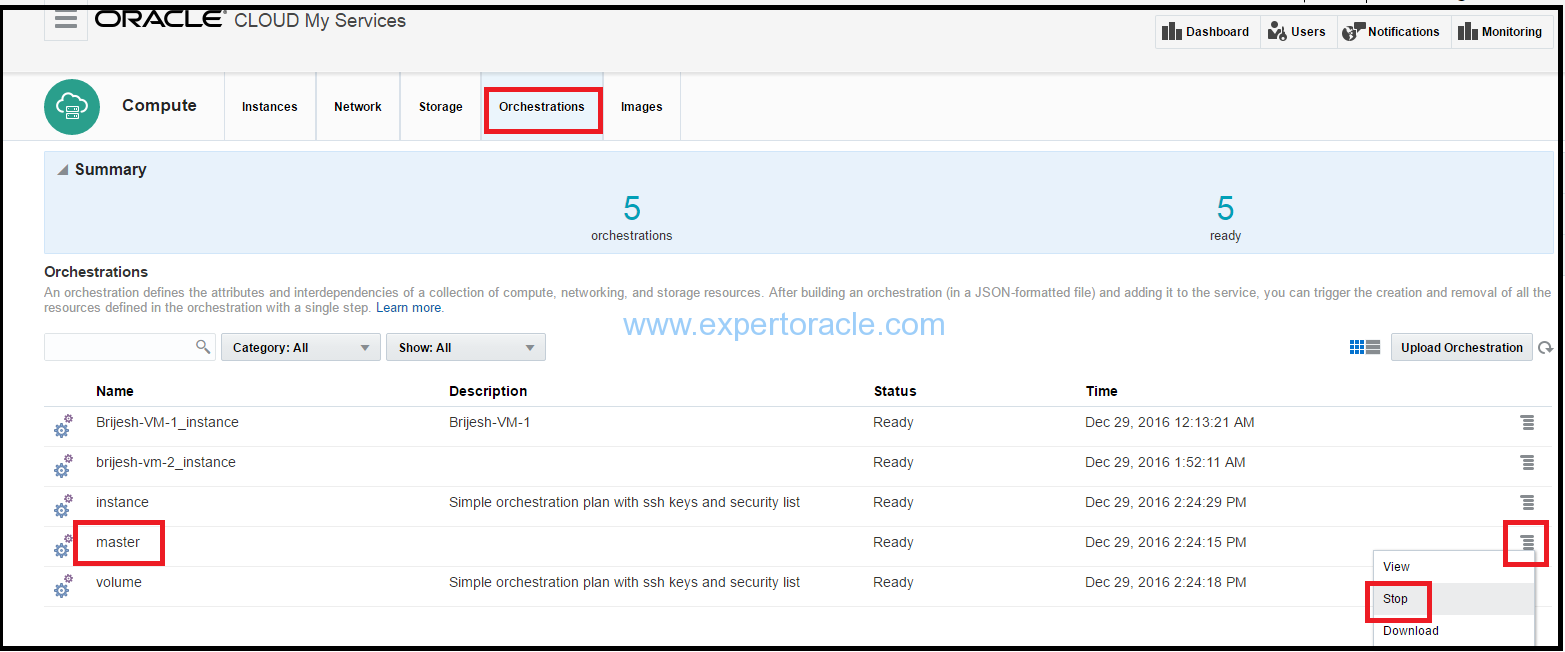
Click Yes on the “Stop Orchestration” warning
Wait for 2 minutes until deletion operation is completed and check under ‘Instances’ tab.

The earlier newly created instance should not be visible now.
Also check under ‘Storage’ tab. The storage volume created earlier should not be visible now.
This completes the deletion of the orchestration.


- Oracle Multitenant DB 4 : Parameters/SGA/PGA management in CDB-PDB - July 18, 2021
- Oracle Multitenant DB 3 : Data Dictionary Architecture in CDB-PDB - March 20, 2021
- Oracle Multitenant DB 2 : Benefits of the Multitenant Architecture - March 19, 2021
Oracle Sales Cloud, Oracle Service Cloud, and Oracle Social Cloud, Oracle CX Cloud is one of the industry’s most complete CX solutions. Oracle offers a comprehensive and fully integrated stack of cloud applications and platform services.