Creating a single compute instance on Oracle Cloud is a simple process. Below we have documented the step-by-step process to achieve this goal.
Process Overview
To create an Oracle Compute Cloud Service instance and set up HTTP access to the we will have complete the following tasks:
1. Generate an SSH key pair on your laptop/machine.
2. Upload the SSH public key to Oracle Compute Cloud Service.
3. Reserve a public IP address for your instance.
4. Create storage volumes to boot the instance from, or to store your data and applications.
5. Create your instance, associate a public IP address with it, configure it for SSH access, and attach the storage volumes that you created, if any.
6. Configure the instance for HTTP access.
Pre –Requisites
Access to Oracle Cloud
Putty software on your windows client
STEP 1: Generating a SSH Key Pair
You will have to provide a SSH public key that will be used for authentication when you log in to the instance.
If you have UNIX/Linux client then you will use ssh-keygen to generate SSH key pair. For our case we will be conencting from a windows based system to Oracle cloud so we will use PUTTY software on our laptop to generate the SSH Key Pair
Find puttygen.exe in the PuTTY folder on your computer, and double-click it. Accept the default key type, SSH-2 RSA, and set the Number of bits in a generated key to 2048, if it is not already set. Then click Generate.

Move your mouse around the blank area to generate randomness. The SSH key pair is generated.
In the next screen as shown below, the key comment is the name of the key. You can keep the generated key comment or create your own. Enter a passphrase in the Key passphrase and the Confirm passphrase fields. Save the private key by entering the same name as you used for the key comment, so that you know which public key to use this private key with.
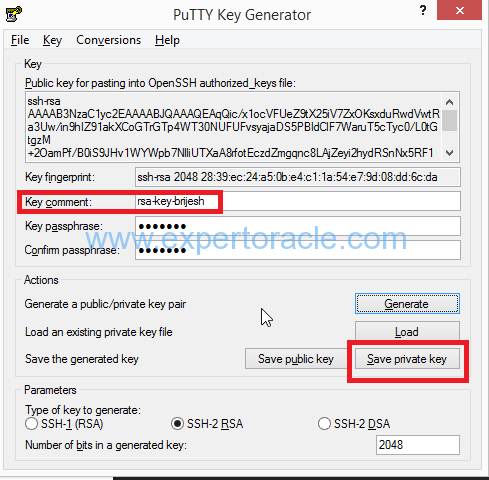
Next, save your SSH public key. select all of the characters in the Public key box as shown in above screenshot, right click somewhere in the selected text and select Copy from the menu.
Open a text editor and paste the characters. Ensure that you paste the text at the first character in the text editor, and don’t insert any line breaks. Save the key using the same root name that you used for the private key. Add a .pub extension.
STEP 2: Uploading the SSH Public Key to Oracle Compute Env
1. Sign in to the Oracle Cloud My Services application at https://cloud.oracle.com/sign_in. The My Services Dashboard page is displayed.
2. Click the menu icon at the upper left corner of the page and select Oracle Compute Cloud Service.
The Oracle Compute Cloud Service console is displayed.
3. From the Network tab on Overview page , click on “SSH Public Keys”.
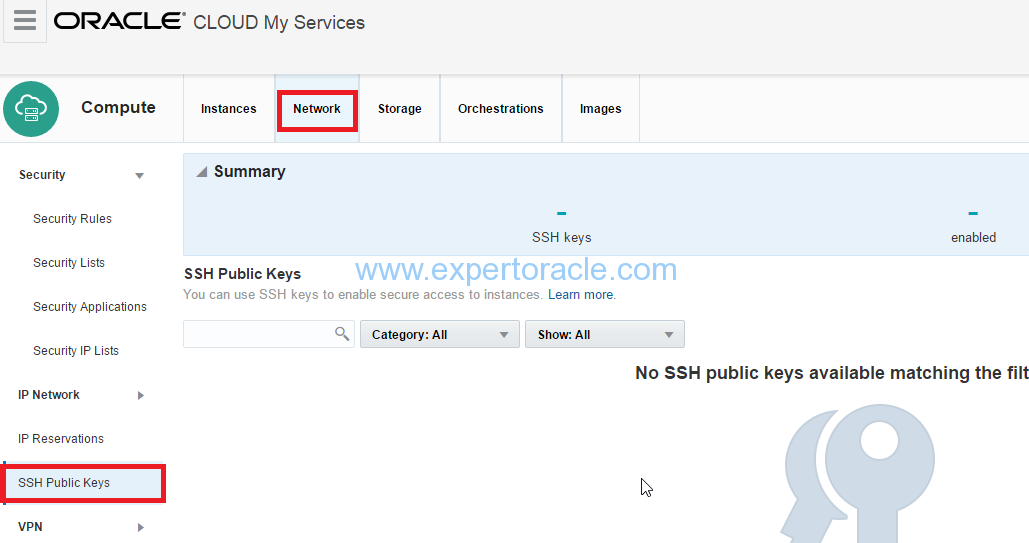
4. Click Add SSH Public Key.
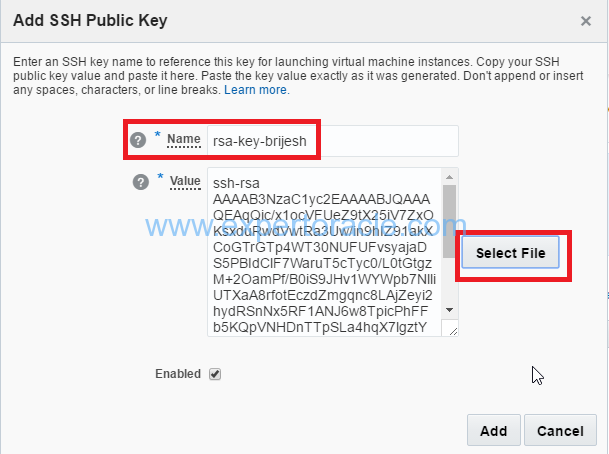
5. In the Add SSH Public Key dialog box, enter a name and the value of the SSH public key you generated, and then click Add.
Note: Paste the key value exactly as it was generated. Don’t append or insert any extra characters, line breaks, or spaces. You can click on “select file” and select the public key that you save in previous step.
Your SSH public key is added to Oracle Compute Cloud Service.

STEP 3: Creating a public IP address Reservation
An IP reservation allows you to specify an IP address that will be associated with your instance.
To create an IP reservation:
1. On the Oracle Compute Cloud Service web console, click the Network tab.
2. Click the IP Reservations tile, and then click Create IP Reservation.
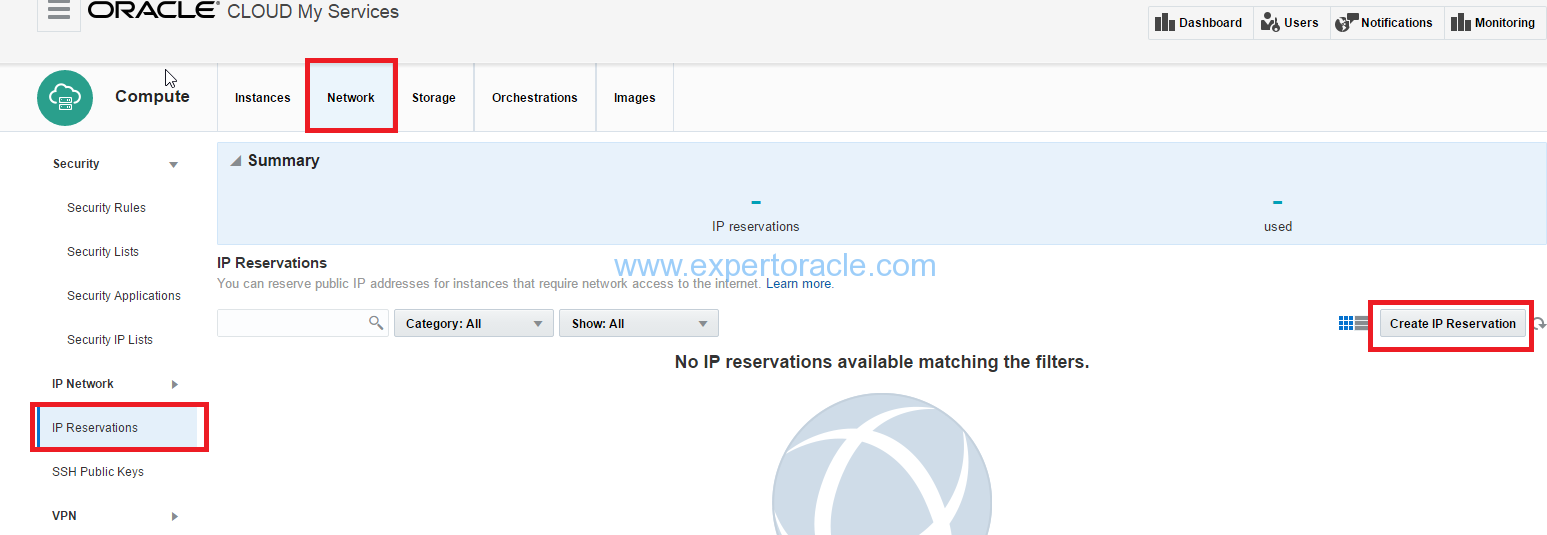
3. In the Create Public IP Reservation dialog box, enter a name for the IP address reservation, and then click Create.
Note: Do not select an instance from the For Instance list.
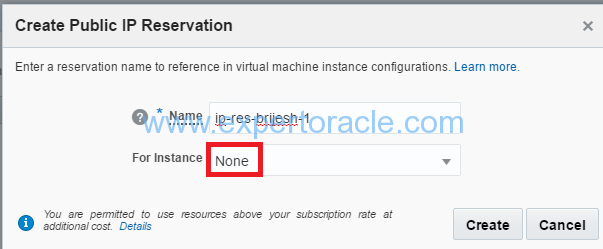
Save the IP address details. You’ll use it to access your instance using SSH later.
STEP 4: Create Security rule for SSH access with Default Security List
A security list is a set of instances that you can specify as a source or destination in security rules and security rules are used to control network access between your instances and the Internet.
Each security rule defines a source, a destination, and a protocol-port combination over which communication is allowed.
Here we’ll set up a security rule to permit ssh requests from hosts on the public Internet to port 22 of the instances in the “default” security list.
To create a security rule:
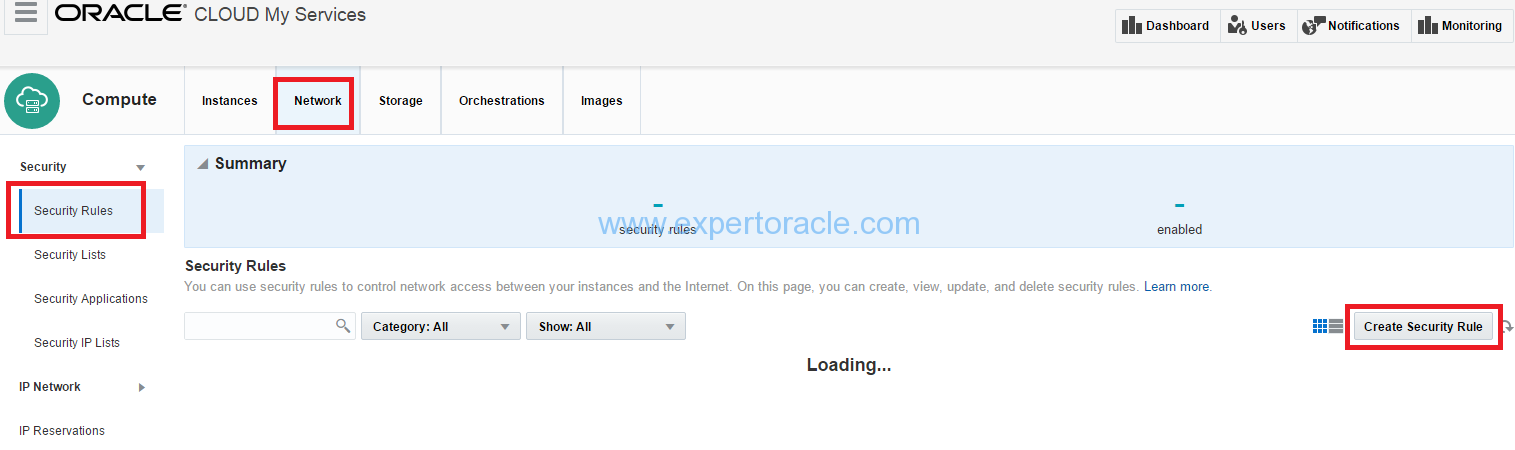
1. On the Oracle Compute Cloud Service web console, click the Network tab, and then click the Security Rules tile.
2. Click Create Security Rule.
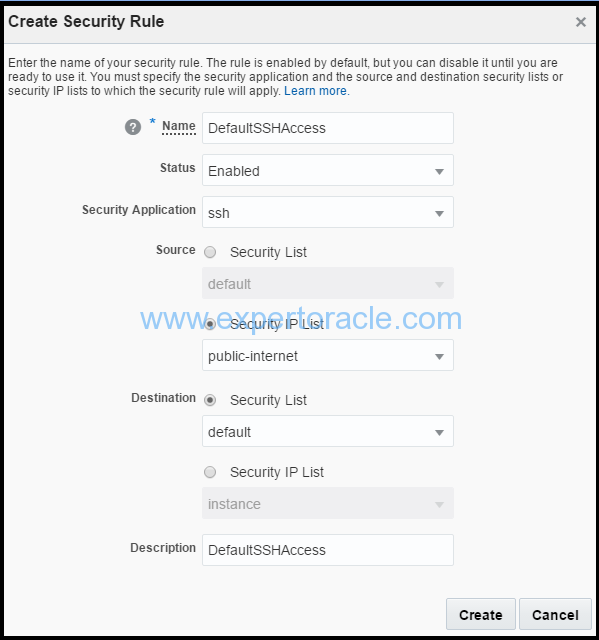
3. In the Create Security Rule dialog box, select or enter the following information, and then click Create.
a. Name: Enter an appropriate name. Example : “DefaultSSHAccess”.
b. Status: Retain the default, Enabled.
c. Security Application: Select ssh.

Note: Many of the commonly-used protocol and port combinations are provided as predefined security applications
 in Oracle Compute Cloud Service. However, if you wish to specify a particular protocol-port mapping that is not
predefined, you can create the required security application in the Security Applications tile.

d. Source: From the Security IP Lists list, select public-internet.
e. Destination: Select the security list that is already available i.e. “default” security list
f. Description: Enter a description “DefaultSSHAccess”
STEP 5: Creating a Bootable Storage Volume
By default, Oracle Compute Cloud Service instanc is set up to boot from a nonpersistent disk. To use a persistent boot disk, create a bootable storage volume. If you use a bootable storage volume as the boot disk for an instance, then any changes that you make to the boot disk aren’t lost even when yo delete the instance.
To create a bootable storage volume:
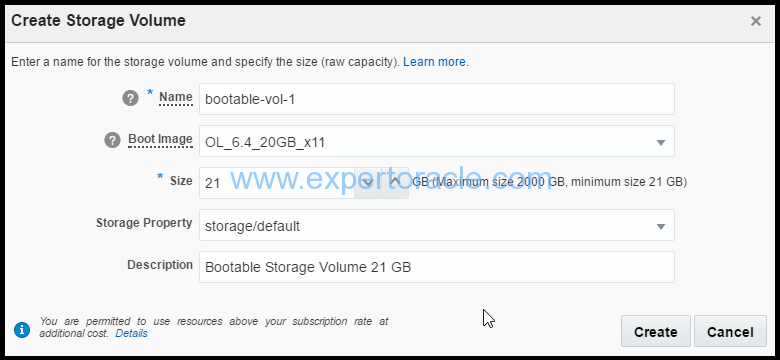
1. Click on Storage tab, and then click Create Storage Volume. The Create Storage Volume page will be opened.
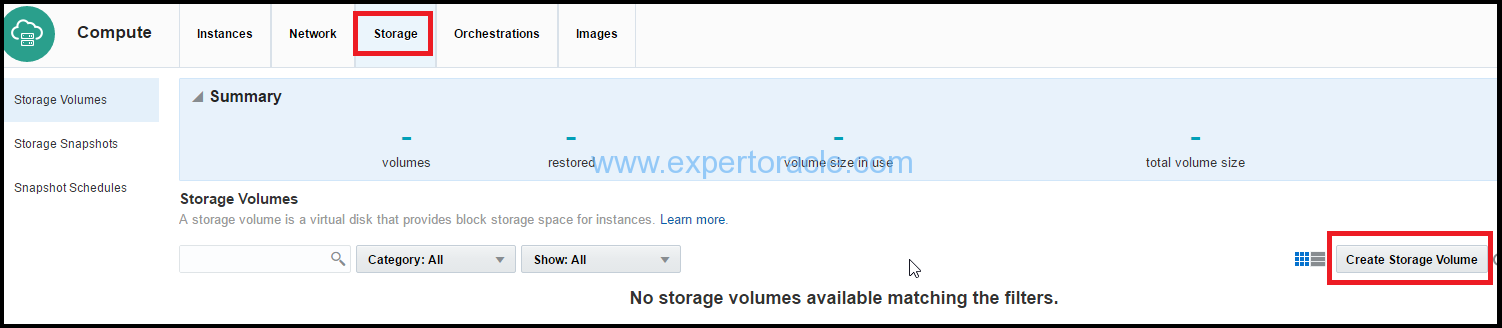
2. In Create Storage Volume page, select or enter the following details and then click Create.
a. Name: Enter an appropriate name. For the purpose of this tutorial, enter bootable-vol-1.
b. Boot Image: Select the image that you want to use to create a bootable storage volume.
   For example, select OL-6.4-20GB-x11.
c. Size: Enter an appropriate size, in GB. For the purpose of this tutorial,
   enter 21 (You may leave it to default). This is the minimum size and we will stick to that for this tutorial.

Note: The size of the storage volume must be at least 5% larger than the selected image size.

d. Storage Property: Select storage/default.
e. Description: Enter an appropriate description. For the purpose of this tutorial,
   enter Bootable Storage Volume 21 GB.
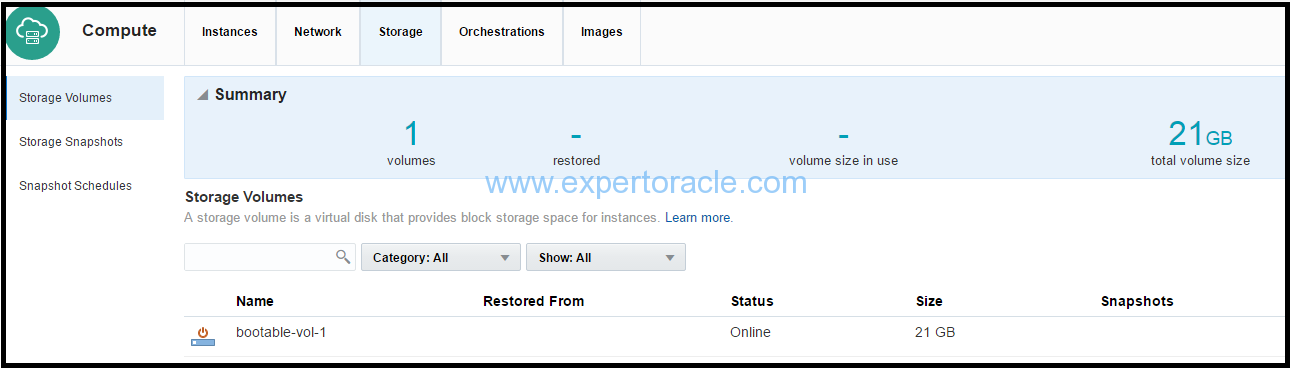
Your storage volume is created.
STEP 6: Creating an Instance
1 Go to the Instances tab. Click Create Instance button. The Create Instance wizard starts.

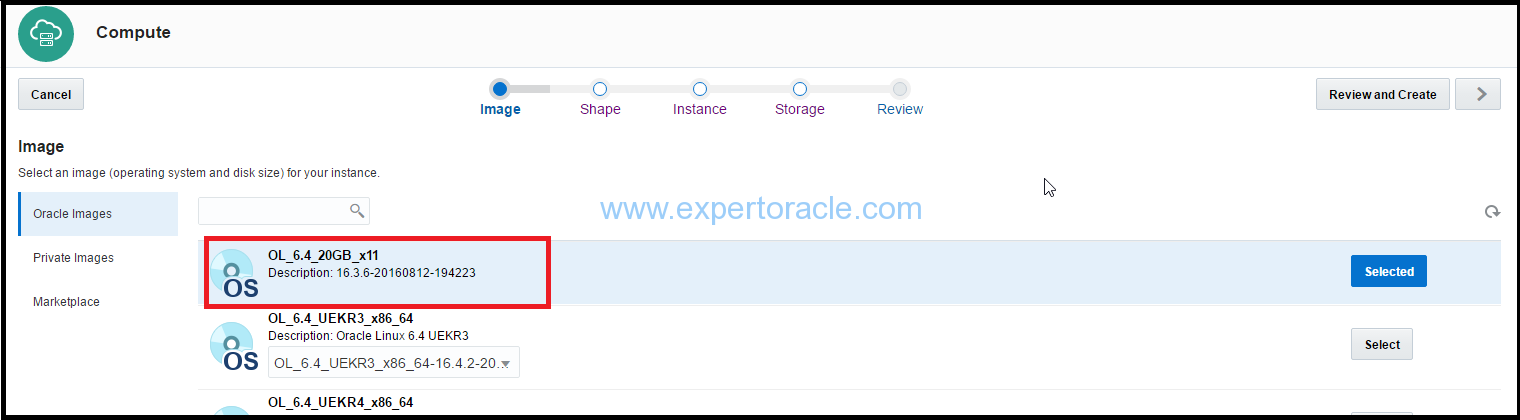
2. Image: On the Image page, select the image that you want to use. We have selected an ol_6.4_20GB_x11 image. Click “>” button
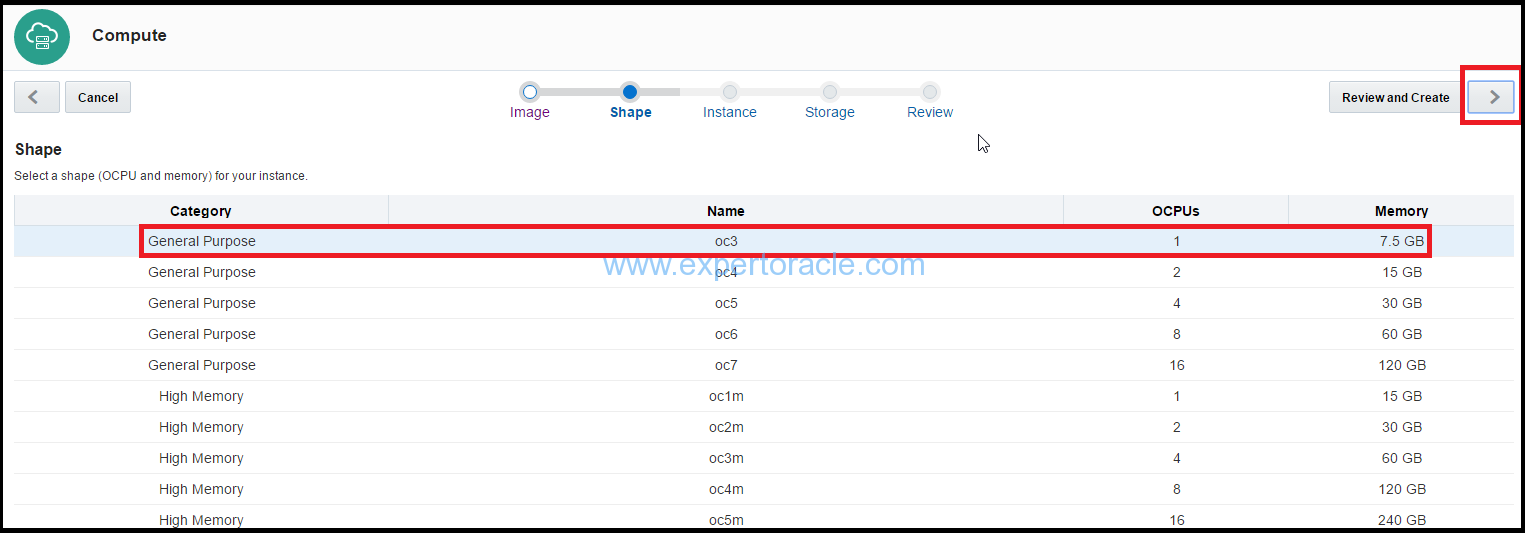
3. Shape: On the Shape page, select an appropriate shape for your instance. The shape determines the number of CPUs and RAM that your instance will have. We have selected oc3 (OCPUs: 1, Memory: 7.5 GB). Click on next (“>”) button.
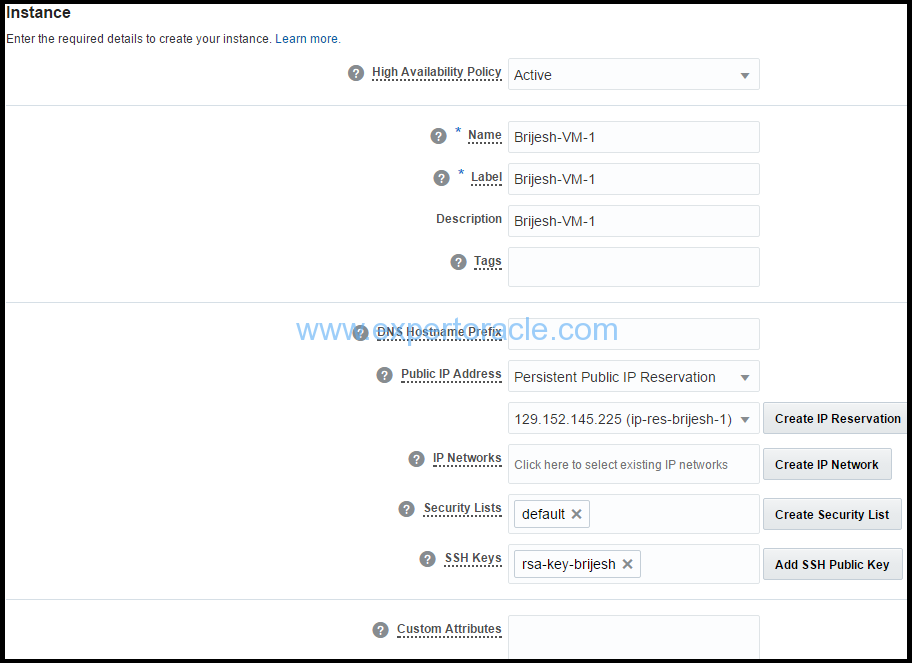
4. In the instance page, select or enter the following information and click on Next (“>”) button:
a. High Availability Policy: Leave it to default as “Active”
b. Name: You may change the auto generated name to some meaningful name. Example we wrote: “Brijesh-VM-1”
c. Label: Enter a label to help identify the instance. If you provide a label, the label is used to
   list the instance on the Overview page.
d. Description: (Optional) Provide some meaningful description
e. Tags: If required, specify a tag to help identify your instance.
f. DNS Hostname Prefix: Enter a string that will be used as a prefix in the domain host name for your instance.
g. Public IP Address: Select Persistent Public IP Reservation, and from the list, select the IP reservation
   that you created earlier.
h. Security Lists: You may select the existing security list (will be shown once you click in the text field).
   We have selected the default security list.
i. SSH Keys: Select the SSH Public Keys that you created earlier from the list which will be shown once
   you click in the text field
j. Custom Attributes: You may add the required custom attributes, if you want to pass.
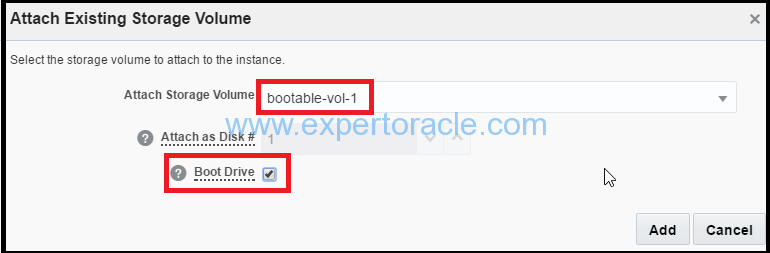
On the Storage page, since we you have created storage volumes already to store applications and data, we will click on “Attach Existing Volume” first and select those volumes.

Make that storage volume Boot Drive also.
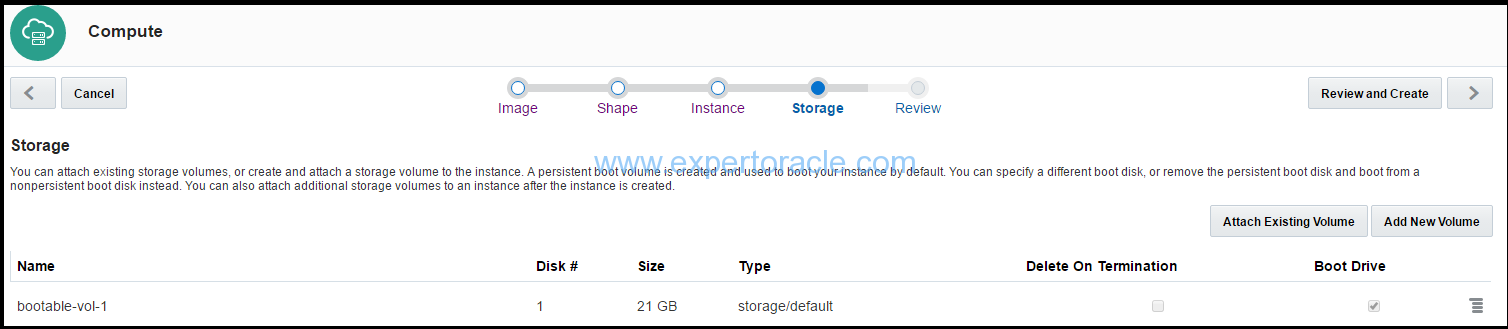
The storage volume will show up fine. Now click ‘>’.
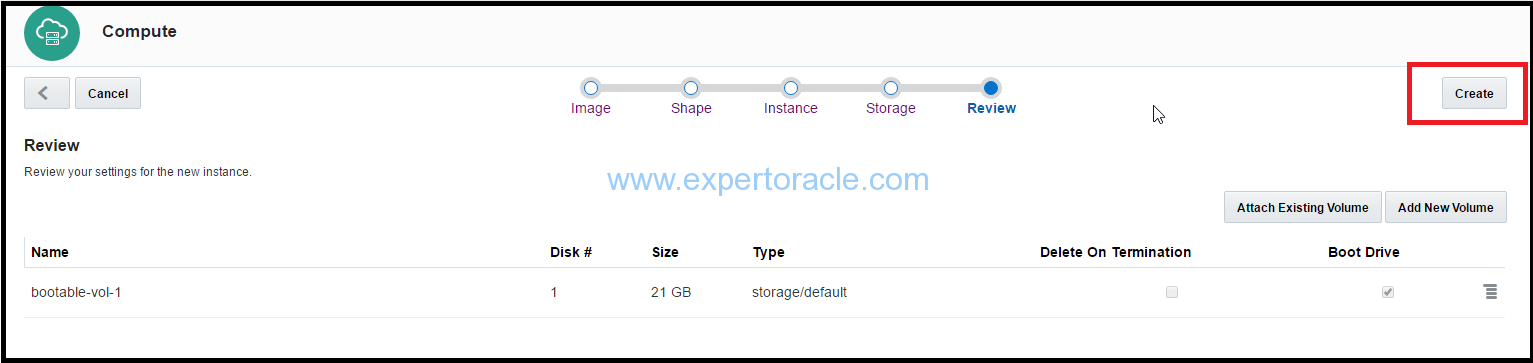
On review and storage section, Click Create
Verify by clicking on the “Instances” tab. The machine will show up there.
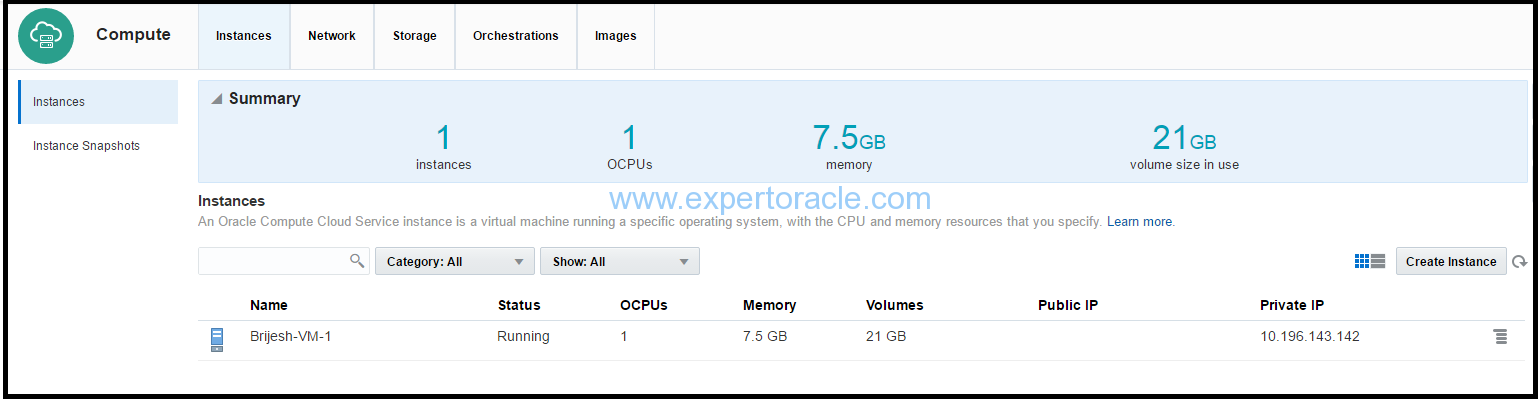
Your instance is created. Your instance is now configured to allow public access only over SSH, and only those having the private key that you created earlier will be able to access.
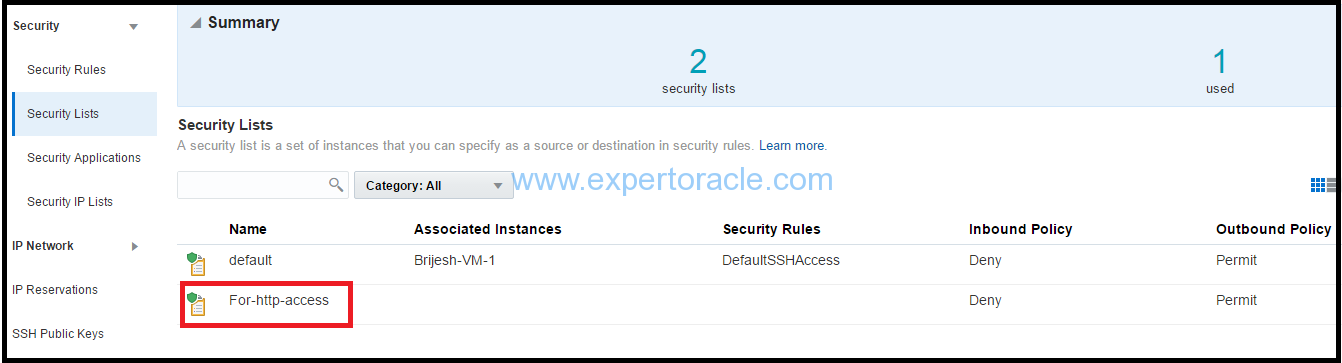
STEP 7: Creating a Security List
A security list is a set of instances that can communicate with each other across all protocols and ports. When you create a security rule, you specify a security list as a destination. This allows traffic from a specified source (such as the public Internet) to access all the instances that are part of the destination security list over a specified protocol and port.
To create a security list to allow access to Port 80 (i.e http)
1. On the Oracle Compute Cloud Service web console, click the Network tab.
2. Click the Security Lists tile, and then click Create Security List.

3. In the Create Security List dialog box, select or enter the following information, and then click Create.
a. Name: Enter an appropriate name. Example "For-http-access".
b. Inbound Policy: Retain the default policy, Deny (Drop packets, no reply).
c. Outbound Policy: Retain the default policy, Permit (Allow packets).
d. Description: Enter a description.

Adding Your Instance to the Security List
1. On the Oracle Compute Cloud Service web console, go to Instances page, click the Instances tile.
2. Go to the instance that you just created, and from the menu, select View.
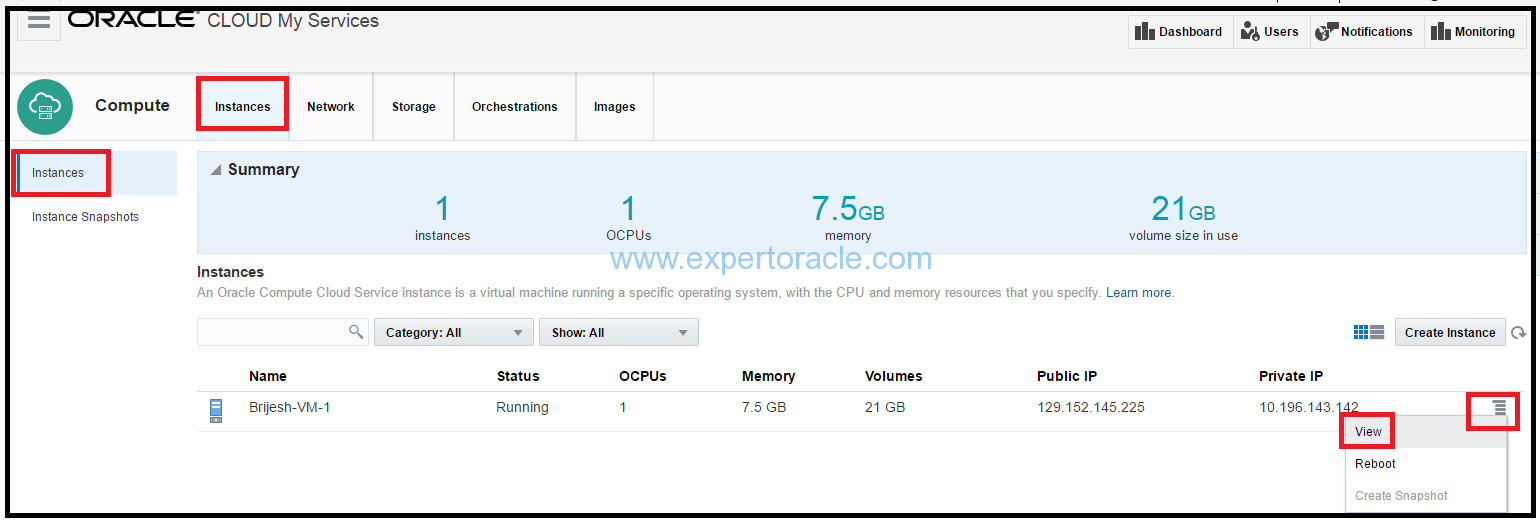
3. On the instance details page, click Add to Security List.

Select the security list that you just created, and then click Attach.This is the second security list attached to the instance in addition to the “default” security list.
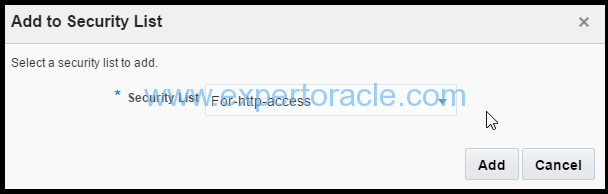
Your instance is added to the “For-http-access” security list.

Creating a Security Rule
When you create a security list, the instances in the security list are isolated from hosts outside the security list. You can use security rules to override the default access settings of security lists. Each security rule defines a source, a destination, and a protocol-port combination over which communication is allowed. Here we will set up a security rule to permit HTTP requests from hosts on the public Internet to port 80 of the instances in the For-http-access security list.
To create a security rule:
1. On the Oracle Compute Cloud Service web console, click the Network tab, and then click the Security Rules tile.
2. Click Create Security Rule.
3. In the Create Security Rule dialog box, select or enter the following information, and then click Create.
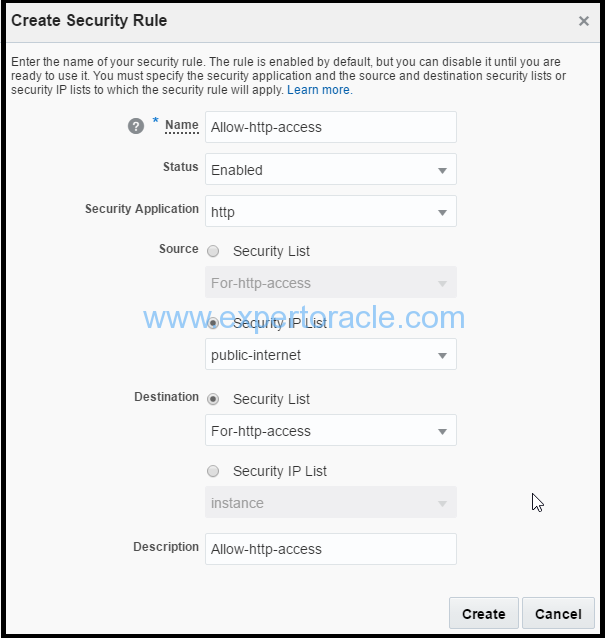
a. Name: Enter an appropriate name. Example: enter Allow-http-access.
b. Status: Retain the default, Enabled.
c. Security Application: Select http.

Note: Many of the commonly-used protocol and port combinations are provided as predefined
 security applications in Oracle Compute Cloud Service. However, if you wish to specify a
 particular protocol-port mapping that is not predefined, you can create the required security
 application in the Security Applications tile.

d. Source: From the Security IP Lists list, select public-internet.
e. Destination: From the Destination list, select the security list that you created earlier, For-http-access.
f. Description: Enter a description.
STEP 8: Logging in to your Instance using SSH
For UNIX/Linux Client you will simply connect by below command
$ ssh -i /path/to/private_key opc@public_ip_address_of_the_instance
Since we have windows laptop as client so we will connect through Putty software.
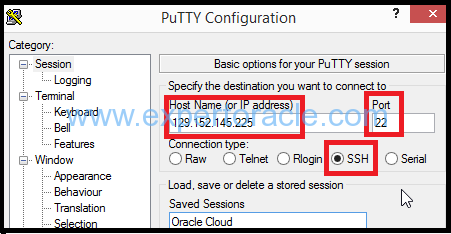
1. Start PuTTY. The PuTTY Configuration window is displayed, showing the Session panel.
2. In the Host Name (or IP address) field, enter the public IP address of your instance.
3. In the Connection type: field, select SSH if it is not already selected.
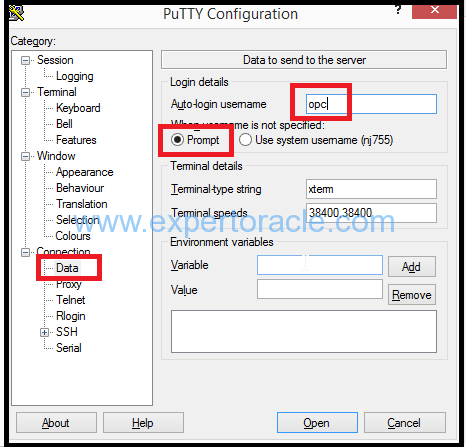
4. In the Category pane, expand Connection, and then click Data. The Data panel is displayed.
5. In the Auto-login username field, enter opc.
Confirm that the When username is not specified option is set to Prompt.
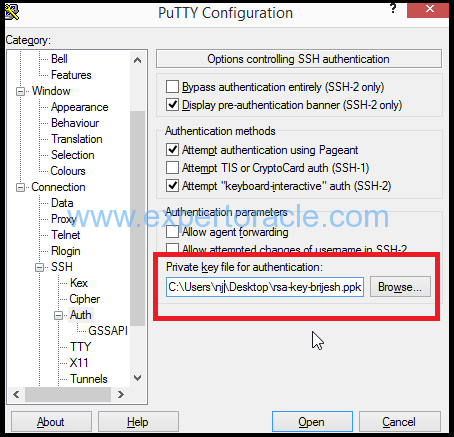
6. In the Category pane, expand SSH, and then click Auth. The Auth panel is displayed.
7. In the Private key file for authentication field, click Browse and select the private key file that you saved earlier.
8. In the Category tree, click Session. The Session panel is displayed.
9. In the Saved Sessions field, enter a name for this connection configuration, and then click Save.
10.Click Open to open the connection.
The PuTTY Configuration window is closed and the PuTTY window is displayed.
11. Enter the passphrase you had provided for your SSH key pair.
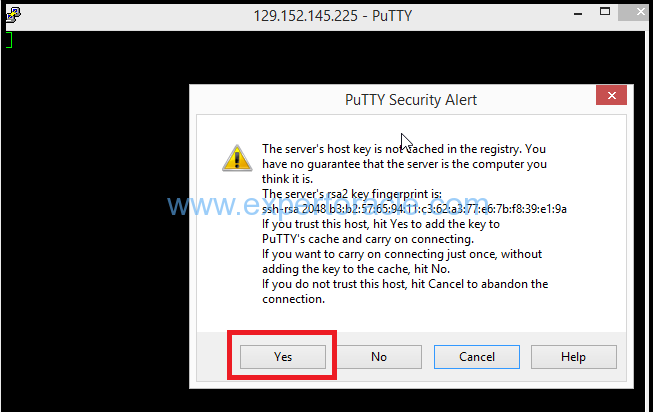
12. The first time you connect to your instance, the PuTTY Security Alert window
is displayed, prompting you to confirm the public key. Click Yes to continue.
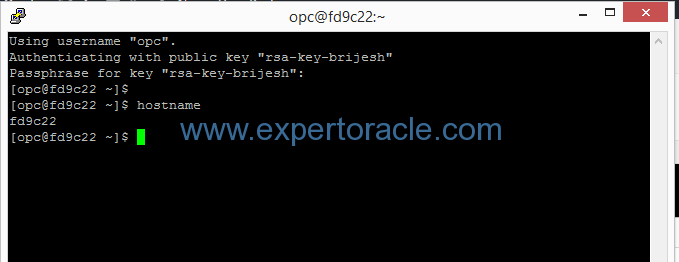
You will be connected to server.
STEP 9: Verifying access to Port 80
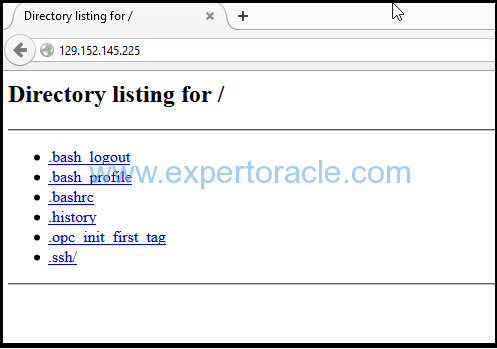
Start Python Web Server services on the server and access the same from the Browser
[opc@fd9c22 ~]$ sudo python -m SimpleHTTPServer 80
Serving HTTP on 0.0.0.0 port 80 ...
This command starts an http server on your instance at port 80
Use the Public Ip of your VM instance and paste it in a new browser window and see if the htp://<ip_addres> opens up fine.


- Oracle Multitenant DB 4 : Parameters/SGA/PGA management in CDB-PDB - July 18, 2021
- Oracle Multitenant DB 3 : Data Dictionary Architecture in CDB-PDB - March 20, 2021
- Oracle Multitenant DB 2 : Benefits of the Multitenant Architecture - March 19, 2021