This post is part 3 of the “11i to R12.1.3 upgrade” series. For other parts click on below links.
1) Install Fresh EBS 11i on Linux 5 32 Bit (PART 1 in “11i to R12.1.3 upgrade” series)
2) Upgrade database 9.2.0.6 to 11.2.0.4 in 11i (PART 2 in “11i to R12.1.3 upgrade” series)
3) 11i Split configuration- Move 11g Database to Linux 6 64Bit (PART 3 in “11i to R12.1.3 upgrade” series)
4) Upgrade 11i TO R12.1.1 (PART 4 in “11i to R12.1.3 upgrade” series)
5) Upgrade R12.1.1 To R12.1.3 (PART 5 in “11i to R12.1.3 upgrade” series)
This post is divided into below steps:
1. Setup Linux 64 bit server
2. Create os users/groups
3. Create new oracle home directory structure
4. Install 11gr2 (11.2.0.4) database software on liinux-64bit
5. Migrate olap from 32-bit to 64-bit – export
6. Shut down the original (source) database
7. Copy the database files from Linux 32-bit to Linux-64 bit
8. Start up the database on Linux 64-bit and migrate
9. Import olap analytical workspaces
10. Start the new database listener
11. De-register the original database server machine
12. Run the script cr9idata.pl
13. Implement and run autoconfig on the database server node
14. Reconfigure the application tier to connect to the target database machine
15. Run autoconfig on the application tier
16. Start all application tier services and verify
1. Setup Linux 64 bit server
We installed Linux 64 bit server on the Oracle Virtual Machine. We used Oracle Enterprise Linux v 6.5
2. Create OS users/groups
# groupadd oinstall
 # groupadd dba
 # useradd -g oinstall -G dba oracle
 # passwd oracle
3. Create new oracle home directory structure
Create same directory structure as it is in 32-Bit Linux System. We had below directory structure.
$ mkdir /d02/app/oracle/product/11.2.0/dbhome_1
$ mkdir /d01/app/oracle/testdbdata
4. Install 11gr2 (11.2.0.4) database software on liinux-64bit
Look at step 11 of this earlier post and install database 11gr2 software.
5. Migrate OLAP from 32-bit to 64-bit – EXPORT Step
1. To obtain the list of AWs that need to be exported execute this command and then proceed to export the AWs that are NOT owned by 0:
 col owner format a15
 col aw_name format a15
 SQL> select OWNER, AW_NAME ,PAGESPACES from dba_aws where owner != 'SYS' order by 1,2;
 OWNER AW_NAME PAGESPACES
 --------------- --------------- ----------
 ZPB ZPBANNOT 7
 ZPB ZPBCODE 292
 ZPB ZPBDATA 7
The columns ‘OWNER’ and ‘AW_NAME’ will be needed in the further steps.
The ‘pagespaces’ give you a rough indication of the size of an AW. This way you get a general idea about which are the largest AW’s that will take the longest to export. The AW’s belonging to SYS are not included as they are re-created when OLAP is installed.
So there is no need to export them.
2. Use the following SQL commands, for EACH AW that was identified in step #1 (NOTE: All quotes are single quotes):
— Replace OWNER.AW_NAME with the the actual OWNER.AW_NAME name
SQL> exec dbms_aw.execute('aw attach OWNER.AW_NAME rw');
Example:
SQL> exec dbms_aw.execute('aw attach ZPB.ZPBANNOT rw');
— (NOTE: this following statement is critical so everything in the AW is in STATUS)
SQL> exec dbms_aw.execute('allstat');
— Replace APPS_DATA_FILE_DIR with a defined directory alias
— Replace export_file_name.eif with a valid eif file name
SQL> exec dbms_aw.execute('export all to eif file ''APPS_DATA_FILE_DIR/ZPBANNOT.eif''');
— Replace OWNER.AW_NAME with the actual OWNER.AW_NAME name
Example:
SQL> exec dbms_aw.execute('aw detach ZPB.ZPBANNOT');
FOR EXAMPLE:
=======================================================
 SQL> exec dbms_aw.execute('aw attach ZPB.ZPBCODE rw');
 SQL> exec dbms_aw.execute('allstat');
 SQL> exec dbms_aw.execute('export all to eif file ''APPS_DATA_FILE_DIR/ZPBCODE.eif''');
 SQL> exec dbms_aw.execute('aw detach ZPB.ZPBCODE');
 =======================================================
 SQL> exec dbms_aw.execute('aw attach ZPB.ZPBDATA rw');
 SQL> exec dbms_aw.execute('allstat');
 SQL> exec dbms_aw.execute('export all to eif file ''APPS_DATA_FILE_DIR/ZPBDATA.eif''');
 SQL> exec dbms_aw.execute('aw detach ZPB.ZPBDATA');
 =======================================================
Where APPS_DATA_FILE_DIR = /d02/app/oracle/product/11.2.0/dbhome_1/appsutil/outbound/testdb_r12upg
Move the generated eif files to 64bit linux server.
3. Delete each AW that has been exported in step #2, using the SQL command:
 SQL> exec dbms_aw.execute('aw delete ZPB.ZPBANNOT');
 SQL> exec dbms_aw.execute('aw delete ZPB.ZPBCODE');
 SQL> exec dbms_aw.execute('aw delete ZPB.ZPBDATA');
Verify>
 SQL> select OWNER, AW_NAME ,PAGESPACES from dba_aws where owner != 'SYS' order by 1,2;
 no rows selected
4. Remove OLAP from the 32bit database and cleanup any INVALID OLAP related objects by executing the following commands
$ cd $ORACLE_HOME/olap/admin --->>> required to locate all embedded calls to other scripts

$ sqlplus /nolog
 SQL> conn / as sysdba
 SQL> @$ORACLE_HOME/olap/admin/catnoamd.sql
 SQL> @$ORACLE_HOME/olap/admin/olapidrp.plb
 SQL> @$ORACLE_HOME/olap/admin/catnoaps.sql
 SQL> @$ORACLE_HOME/olap/admin/catnoxoq.sql
 SQL> @$ORACLE_HOME/olap/admin/cwm2drop.sql
 SQL> @$ORACLE_HOME/rdbms/admin/utlrp.sql
SQL> select owner, object_name, object_type from dba_objects where status <> 'VALID';
Remove any INVALID OLAP related objects (marked red below)
OWNER OBJECT_NAME OBJECT_TYPE
 --------------- --------------------------------------------- -------------------
 SYS GENINTERRUPTABLEINTERFACE PACKAGE BODY
 SYS GENINTERRUPTABLEINTERFACE PACKAGE
 SYS OLAPIHANDSHAKE FUNCTION
 SYS OLAPIBOOTSTRAP FUNCTION
 PUBLIC GENINTERRUPTABLEINTERFACE SYNONYM
 PUBLIC OLAPIHANDSHAKE SYNONYM
 PUBLIC OLAPIBOOTSTRAP SYNONYM
 APPS ZPB_BUILD_METADATA PACKAGE BODY
 APPS CS_WF_ACTIVITIES_PKG PACKAGE BODY

9 rows selected.
SQL> select comp_id, comp_name, version, status from dba_registry where comp_name like '%OLAP%';
no rows selected
SQL> drop function SYS.OLAPIBOOTSTRAP;
Function dropped.
SQL> drop function SYS.OLAPIHANDSHAKE;
Function dropped.
SQL> drop package SYS.GENINTERRUPTABLEINTERFACE;
Package dropped.
SQL> drop public synonym OLAPIBOOTSTRAP;
Synonym dropped.
SQL> drop public synonym OLAPIHANDSHAKE;
Synonym dropped.
SQL> drop public synonym GENINTERRUPTABLEINTERFACE;
Synonym dropped.
6. Shut down the original application & database on Linux 32 Bit
Shutdown both the application and database running from Linux 32 Bit.
7. Copy the database files from Linux 32-bit to Linux-64 bit
Copy init.ora, data files, control file, and the redo log files from the 32-bit Linux computer to the corresponding locations on the 64-bit Linux computer.
Modify the configuration INIT file.
1) setting _system_trig_enabled=false
2) Update the memory requirements included in the file.
3) Edit the control file location if necessary.
Oracle recommends that you double the values of shared pool, java pool, sga_target and large pool listed in the init.ora file
8. Start up the database on Linux 64-bit and migrate
Start up the database on the Linux 64 Bit.
Recreate the database control files (only required when you have changed the dbf location)
Migrate the database from 32-bit to 64-bit (recompile pl/sql modules and change the word size)
$ cd $ORACLE_HOME/rdbms/admin/
 $ sqlplus / as sysdba
 SQL> SPOOL /tmp/utlirp.log
 SQL> STARTUP UPGRADE pfile=$ORACLE_HOME/dbs/inittestdb.ora;
Run the following command on the 64-bit Oracle Database, to invalidate all the PL/SQL modules:
 SQL> @$ORACLE_HOME/rdbms/admin/utlirp.sql

 Shut down the 64-bit Oracle Database:
  SQL> shutdown immediate;

 Start the 64-bit Oracle Database:
 SQL> STARTUP pfile=$ORACLE_HOME/dbs/inittestdb.ora;
Run the below command after connecting as SYS:
 ++++++++++++++++++++++++++++++++++++++++
 begin
 update obj$ set status=5 where obj#=(select obj# from obj$,javasnm$
 where owner#=0 and type#=29 and short(+)=name and
 nvl(longdbcs,name)='oracle/aurora/rdbms/Compiler');
 commit;
 declare
 cursor C1 is select
 'DROP JAVA DATA "' || u.name || '"."' || o.name || '"'
 from obj$ o,user$ u where o.type#=56 and u.user#=o.owner#;
ddl_statement varchar2(200);
 iterations number;
 previous_iterations number;
 loop_count number;
 my_err number;
 begin
 previous_iterations := 10000000;
 loop
 -- To make sure we eventually stop, pick a max number of iterations
 select count(*) into iterations from obj$ where type#=56;
 exit when iterations=0 or iterations >= previous_iterations;
 previous_iterations := iterations;
 loop_count := 0;
 open C1;
 loop
 begin
 fetch C1 into ddl_statement;
 exit when C1%NOTFOUND or loop_count > iterations;
 exception when others then
 my_err := sqlcode;
 if my_err = -1555 then -- snapshot too old, re-execute fetch query
 exit;
 else
 raise;
 end if;
 end;
 initjvmaux.exec(ddl_statement);
 loop_count := loop_count + 1;
 end loop;
 close C1;
 end loop;
 end;
 commit;
 initjvmaux.drp('delete from java$policy$shared$table');
 update obj$ set status=1 where obj#=(select obj# from obj$,javasnm$
 where owner#=0 and type#=29 and short(+)=name and
 nvl(longdbcs,name)='oracle/aurora/rdbms/Compiler');
 commit;
 end;
 /
Now create java system again
SQL> create or replace java system;
 /
++++++++++++++++++++++++++++++++++++++++++++++
Revalidate all the existing PL/SQL modules in the format required by the 64-bit Oracle Database:
SQL> @$ORACLE_HOME/rdbms/admin/utlrp.sql;
**Also remove _SYSTEM_TRIG_ENABLED=FALSE from INIT.ORA
9. Import OLAP analytical workspaces
Add OLAP back into the database by connecting to the database ‘/ as sysdba’ and executing:
SQL> @$ORACLE_HOME/olap/admin/olap.sql SYSAUX TEMP;
create APPS_DATA_FILE_DIR = /d02/app/oracle/product/11.2.0/dbhome_1/appsutil/outbound/testdb_r12upg
and copy eif file to above directory
SQL> exec dbms_aw.execute('aw create ZPB.ZPBCODE');
 SQL> exec dbms_aw.execute('import all from eif file ''APPS_DATA_FILE_DIR/ZPBCODE.eif'' data dfns');
 SQL> exec dbms_aw.execute('update');
 SQL> commit;
 SQL> exec dbms_aw.execute('aw detach ZPB.ZPBCODE');
10. Start the new database listener
Create new listener using ‘netca’
11. De-register the original database server machine
De-register the original database server machine from the AutoConfig repository in the Applications database.
Use SQL*Plus to connect to the database as APPS and run the following command:
$ sqlplus apps/[APPS password]
 SQL> exec fnd_conc_clone.setup_clean;
12. Run the script cr9idata.pl
On the database server node, as the owner of the Oracle RDBMS file system and database instance, run the following command to create the
$ORACLE_HOME/nls/data/9idata directory.
$ perl $ORACLE_HOME/nls/data/old/cr9idata.pl
Now add below env variable also to .profile.
export ORA_NLS10= /d02/app/oracle/product/11.2.0/dbhome_1/nls/data/9idata
13. Implement and run autoconfig on the database server node
Implement and run AutoConfig in the new Oracle home on the database server node. If the database listener of the new Oracle home is defined differently than the old Oracle home, you must also run AutoConfig on each application tier server node to update the system with the new listener.
On the Application Tier (as the APPLMGR user):
Create the appsutil.zip file by executing:
$ADPERLPRG $AD_TOP/bin/admkappsutil.pl
This will create appsutil.zip in $APPL_TOP/admin/out
On the Database Tier (as the ORACLE user):
Copy or FTP the appsutil.zip file to the <RDBMS ORACLE_HOME>
$ cd <RDBMS ORACLE_HOME>
 $ unzip -o appsutil.zip
Run AutoConfig by executing:
$ORACLE_HOME/appsutil/scripts/$CONTEXT_NAME/adautocfg.sh
Shut down all processes, including the database and the listener, and restart them to load the new environment settings.
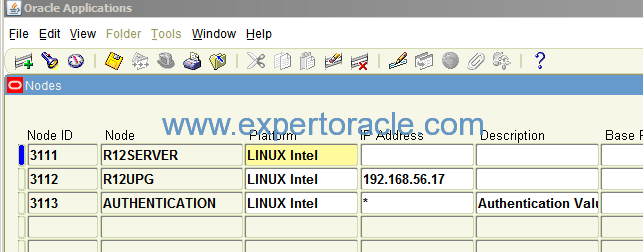
14. Reconfigure the application tier to connect to the target database machine
Add both nodes entry in both /etc/hosts file.
Update the following variables in the Applications context file to match the target database configuration:
Variable Name                                       Value
 s_dbhost                       r12server
 s_dbdomain                     localdomain
 s_dbport                       1522
 s_apps_jdbc_connect_descriptor NULL
 s_isDB                         NO
15. Run autoconfig on the application tier
Make sure that the new database and listener are running, and run AutoConfig on the application tier:
$ cd [COMMON_TOP]/admin/scripts/[CONTEXT_NAME]
 $ adautocfg.sh
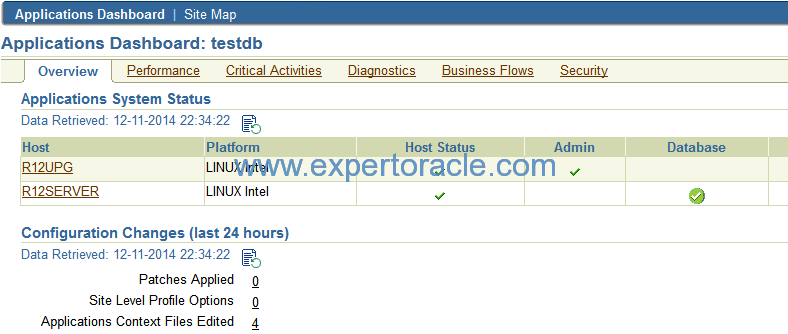
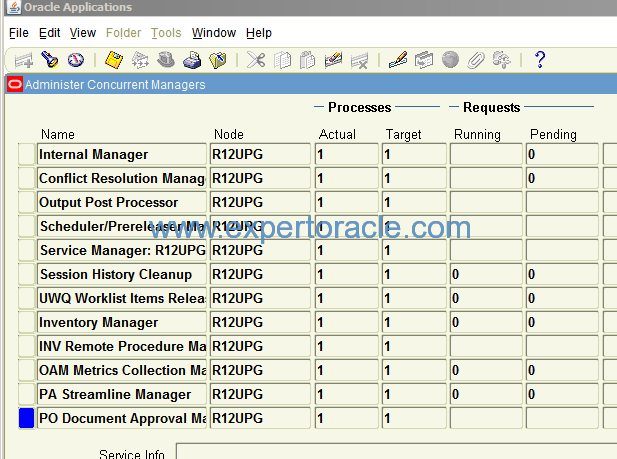
16. Start all application tier services and verify
Restart all services on the application tier.
$ adstrtal.sh apps/[APPSpwd]
Verify!


- Oracle Multitenant DB 4 : Parameters/SGA/PGA management in CDB-PDB - July 18, 2021
- Oracle Multitenant DB 3 : Data Dictionary Architecture in CDB-PDB - March 20, 2021
- Oracle Multitenant DB 2 : Benefits of the Multitenant Architecture - March 19, 2021